cherry tomato galette
September 13, 2015

It’s at this time of year that we truly experience abundance. Nature is throwing itself, full force, on the world by end of summer, exploding with fertility and growth and plenty. Visit a farmer and you’ll see the wearied look of so many tomatoes to pick, so many squash to harvest, so many beans dripping from the vine. It’s a blessed season and I try to take advantage of it by buying too many tomatoes, a full stock of squash, and as many beans as I can reasonably eat in the coming week. On the tomato front I’ve spent the day slow roasting tomatoes, making ribolitta with tomatoes, slicing fresh tomatoes on sandwiches, and prepping this cherry tomato galette for dinner tonight. Create a base of whatever tickles your fancy – pesto, olive tapenade, or herbed-ricotta if you’re a cheese eater. Smother it with fresh tomatoes. Wrap it like the present it is, from mother nature herself. Bake. And saveur the sweetness that is abundance.
1 package puff pastry
1 jar pesto
A large basket of cherry tomatoes
Sea salt and pepper
Preheat the oven to 375 degrees. Roll out the puff pastry on a floured surface. Transfer to a parchment-lined baking sheet. Spread pesto, tapenade, or whatever you’re using as a base, on the puff pastry up to about 1/2 inch from the edges. Smoother with sliced and/or quartered cherry tomatoes. Sprinkle liberally with sea salt and pepper. Fold the edges of the puff pastry over the tomatoes. Place in the oven and bake for approximately 30 minutes or until pastry is golden brown and tomatoes are sweetly singing.
veggie pakora
April 17, 2015
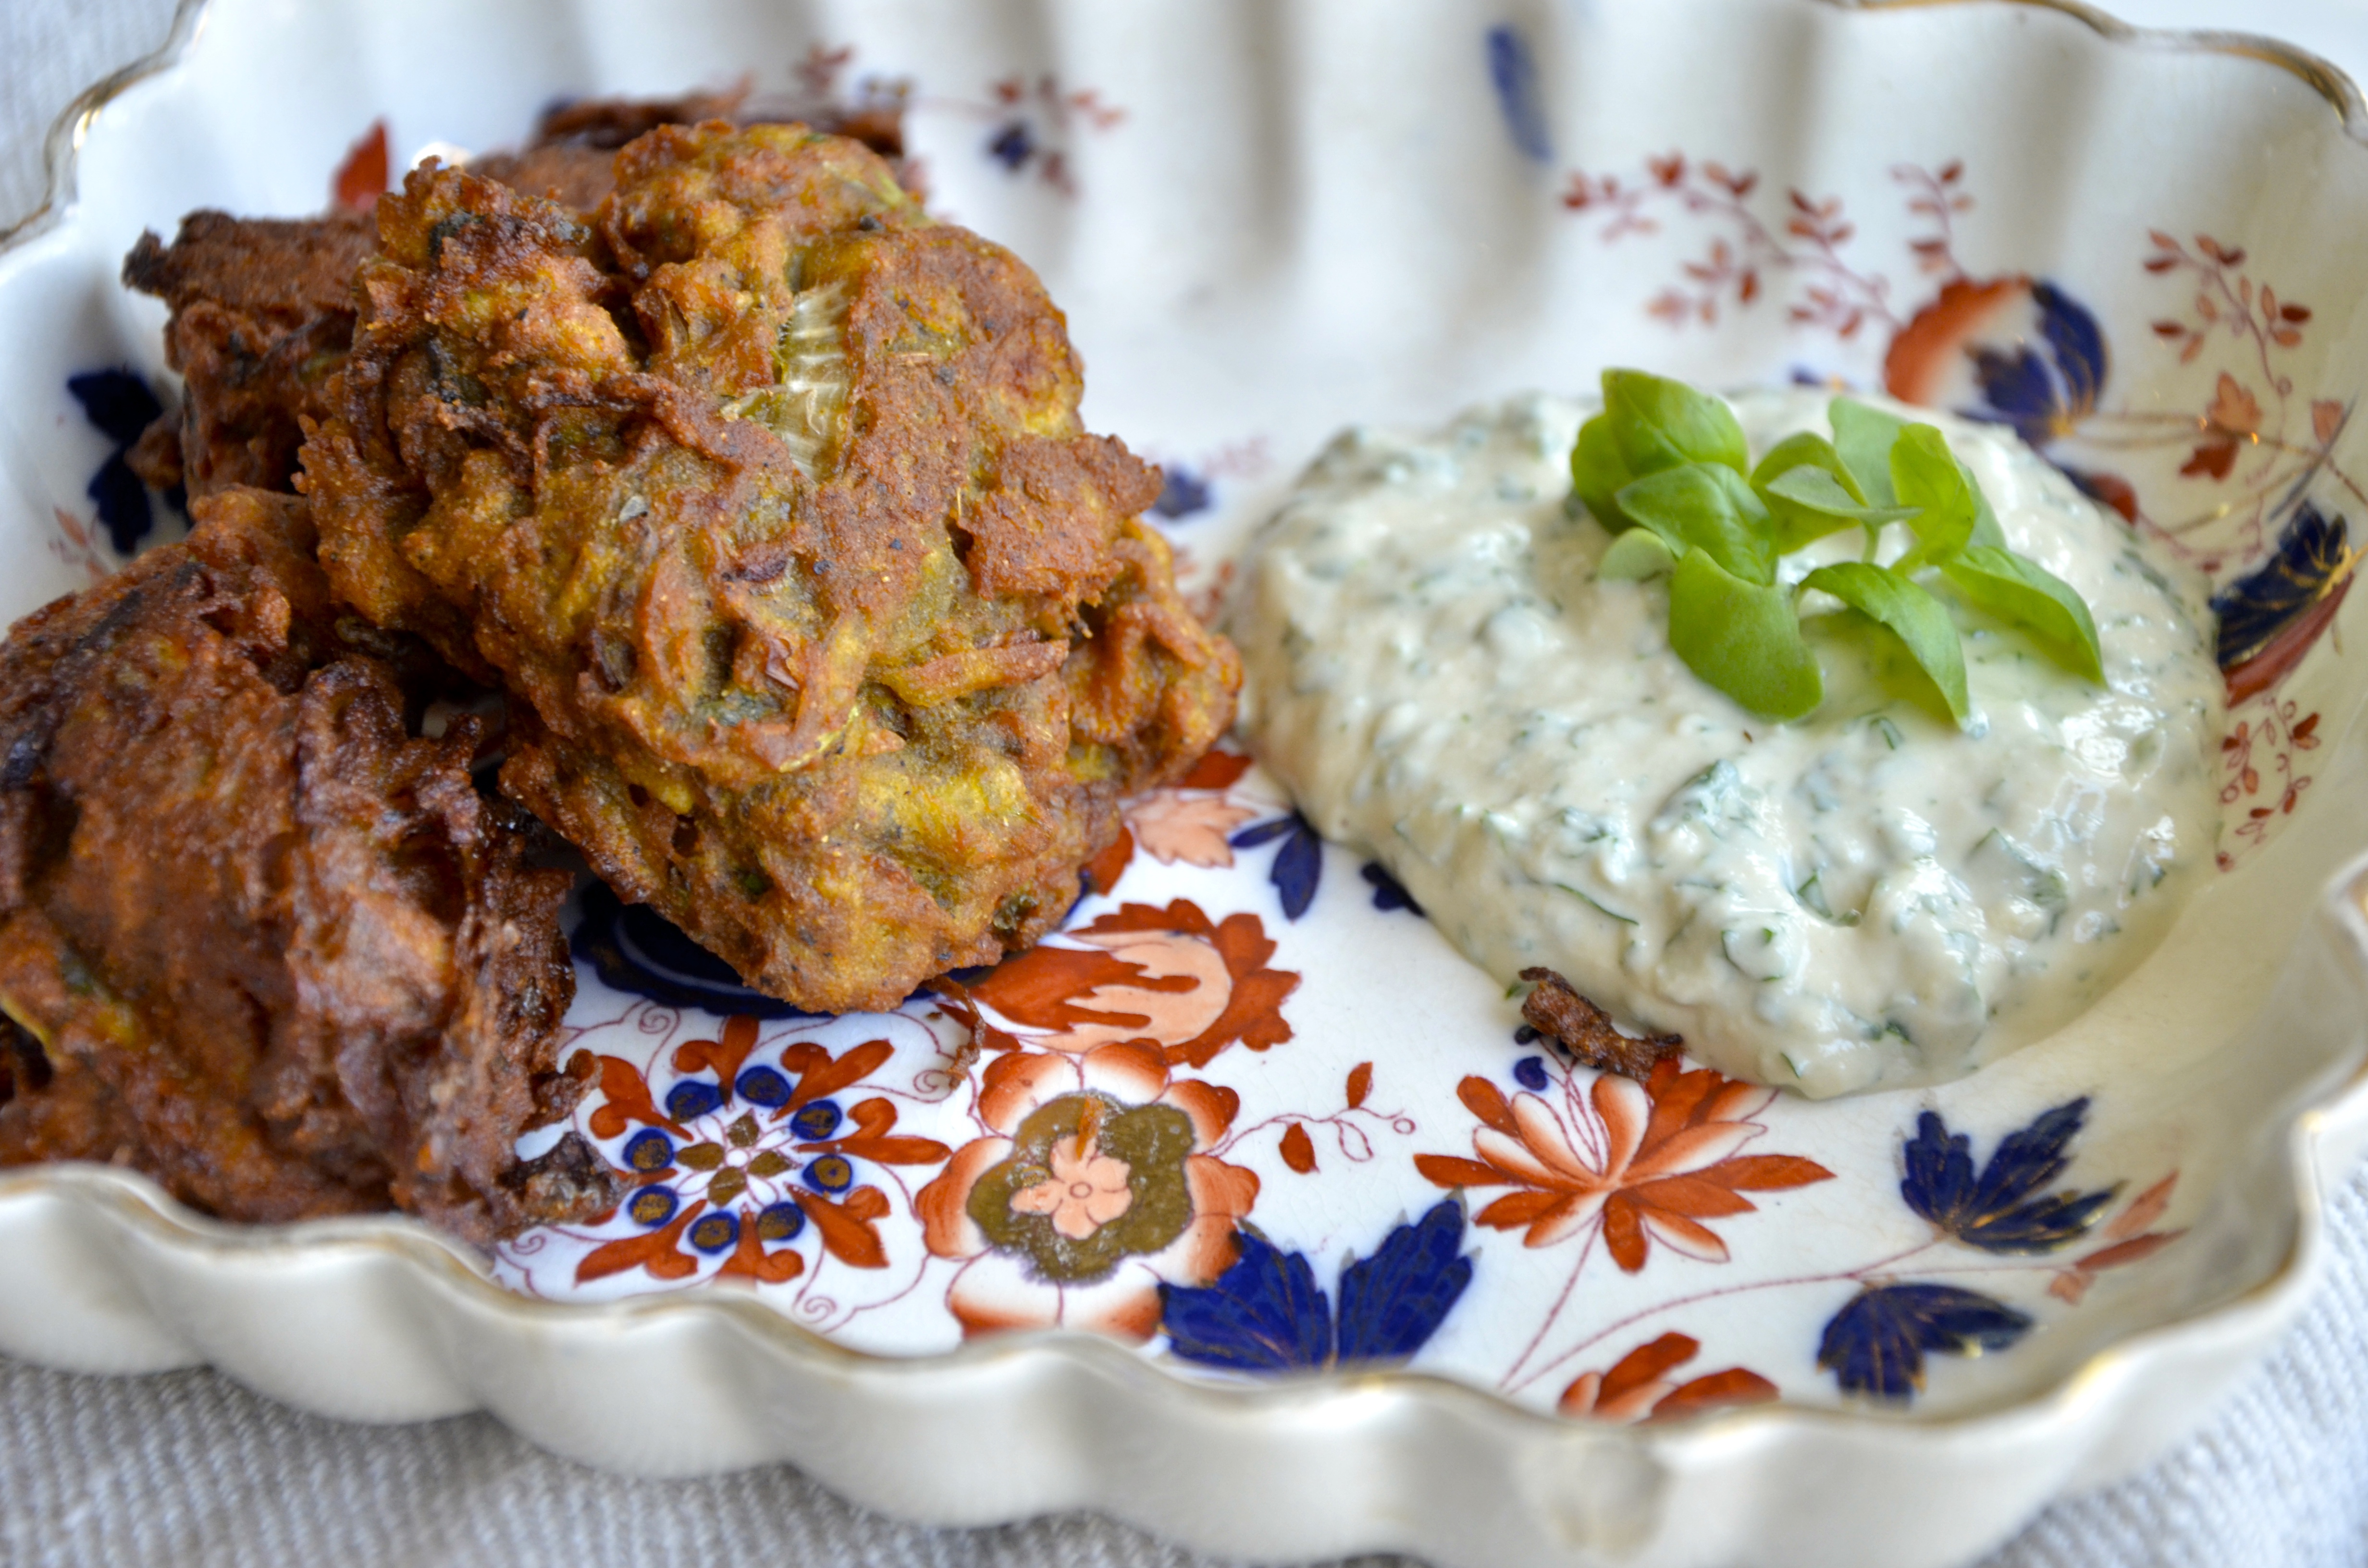
My eldest, Joshua, is in the middle of his final exams. Like the best of us, he’s looking for a few procrastination strategies which, fortunately for our household, took the form of making veggie pakoras today. Spicy. Deep-fried. Oniony. Crunchy. What student could ask for anything more? What mom could be happier to smell the sweet smell of home-cooked goodness in the house? What food blogger could be more pleased to swoop in and post the results?
1 cup chickpea flour, sieved
1 medium onion
3 medium potatoes
1 tsp of salt
2 tsps of garam masala
1 tsp of turmeric
2 chillies, finely chopped
1 tbsp ginger, grated (optional)
Handful of coriander, chopped
2 tsp of dried fenugreek leaves
1 tsp of cumin seeds
½ tsp of red chilli powder
Water
Oil for deep frying
Heat up the oil in a karahi or wok over medium heat.
Slice the onion lengthways very thinly and place in a bowl. Peel and grate (or very finely chop) the potatoes into the same bowl. You can also use aubergines and cauliflower – chop into very small pieces.
Sprinkle all the dry spices and freshly chopped coriander, chillies and ginger into the bowl and then sieve in the chickpea flour – mix together using your hands. Add a small amount of water a little at a time to create a thick batter that coats all the vegetables. Squeeze the mixture through your fingers to ensure all the spices mix through. (Do not leave the batter and vegetable mixture for too long before cooking.)
Test your oil is hot enough by dropping a little batter into the oil. If it browns and rises immediately then it is ready. Very carefully drop in spoonfuls of the mixture into the oil and fry until golden brown. Using a slotted spoon move the pakora around, be careful not to overcrowd them.
Once golden brown and crisp remove from the oil and set on some paper towel. Serve with a yummy raita or a vegan-version tahini dip.
Thanks to Hari Ghotra for Joshua’s inspiration.
classic gremolata
April 11, 2015
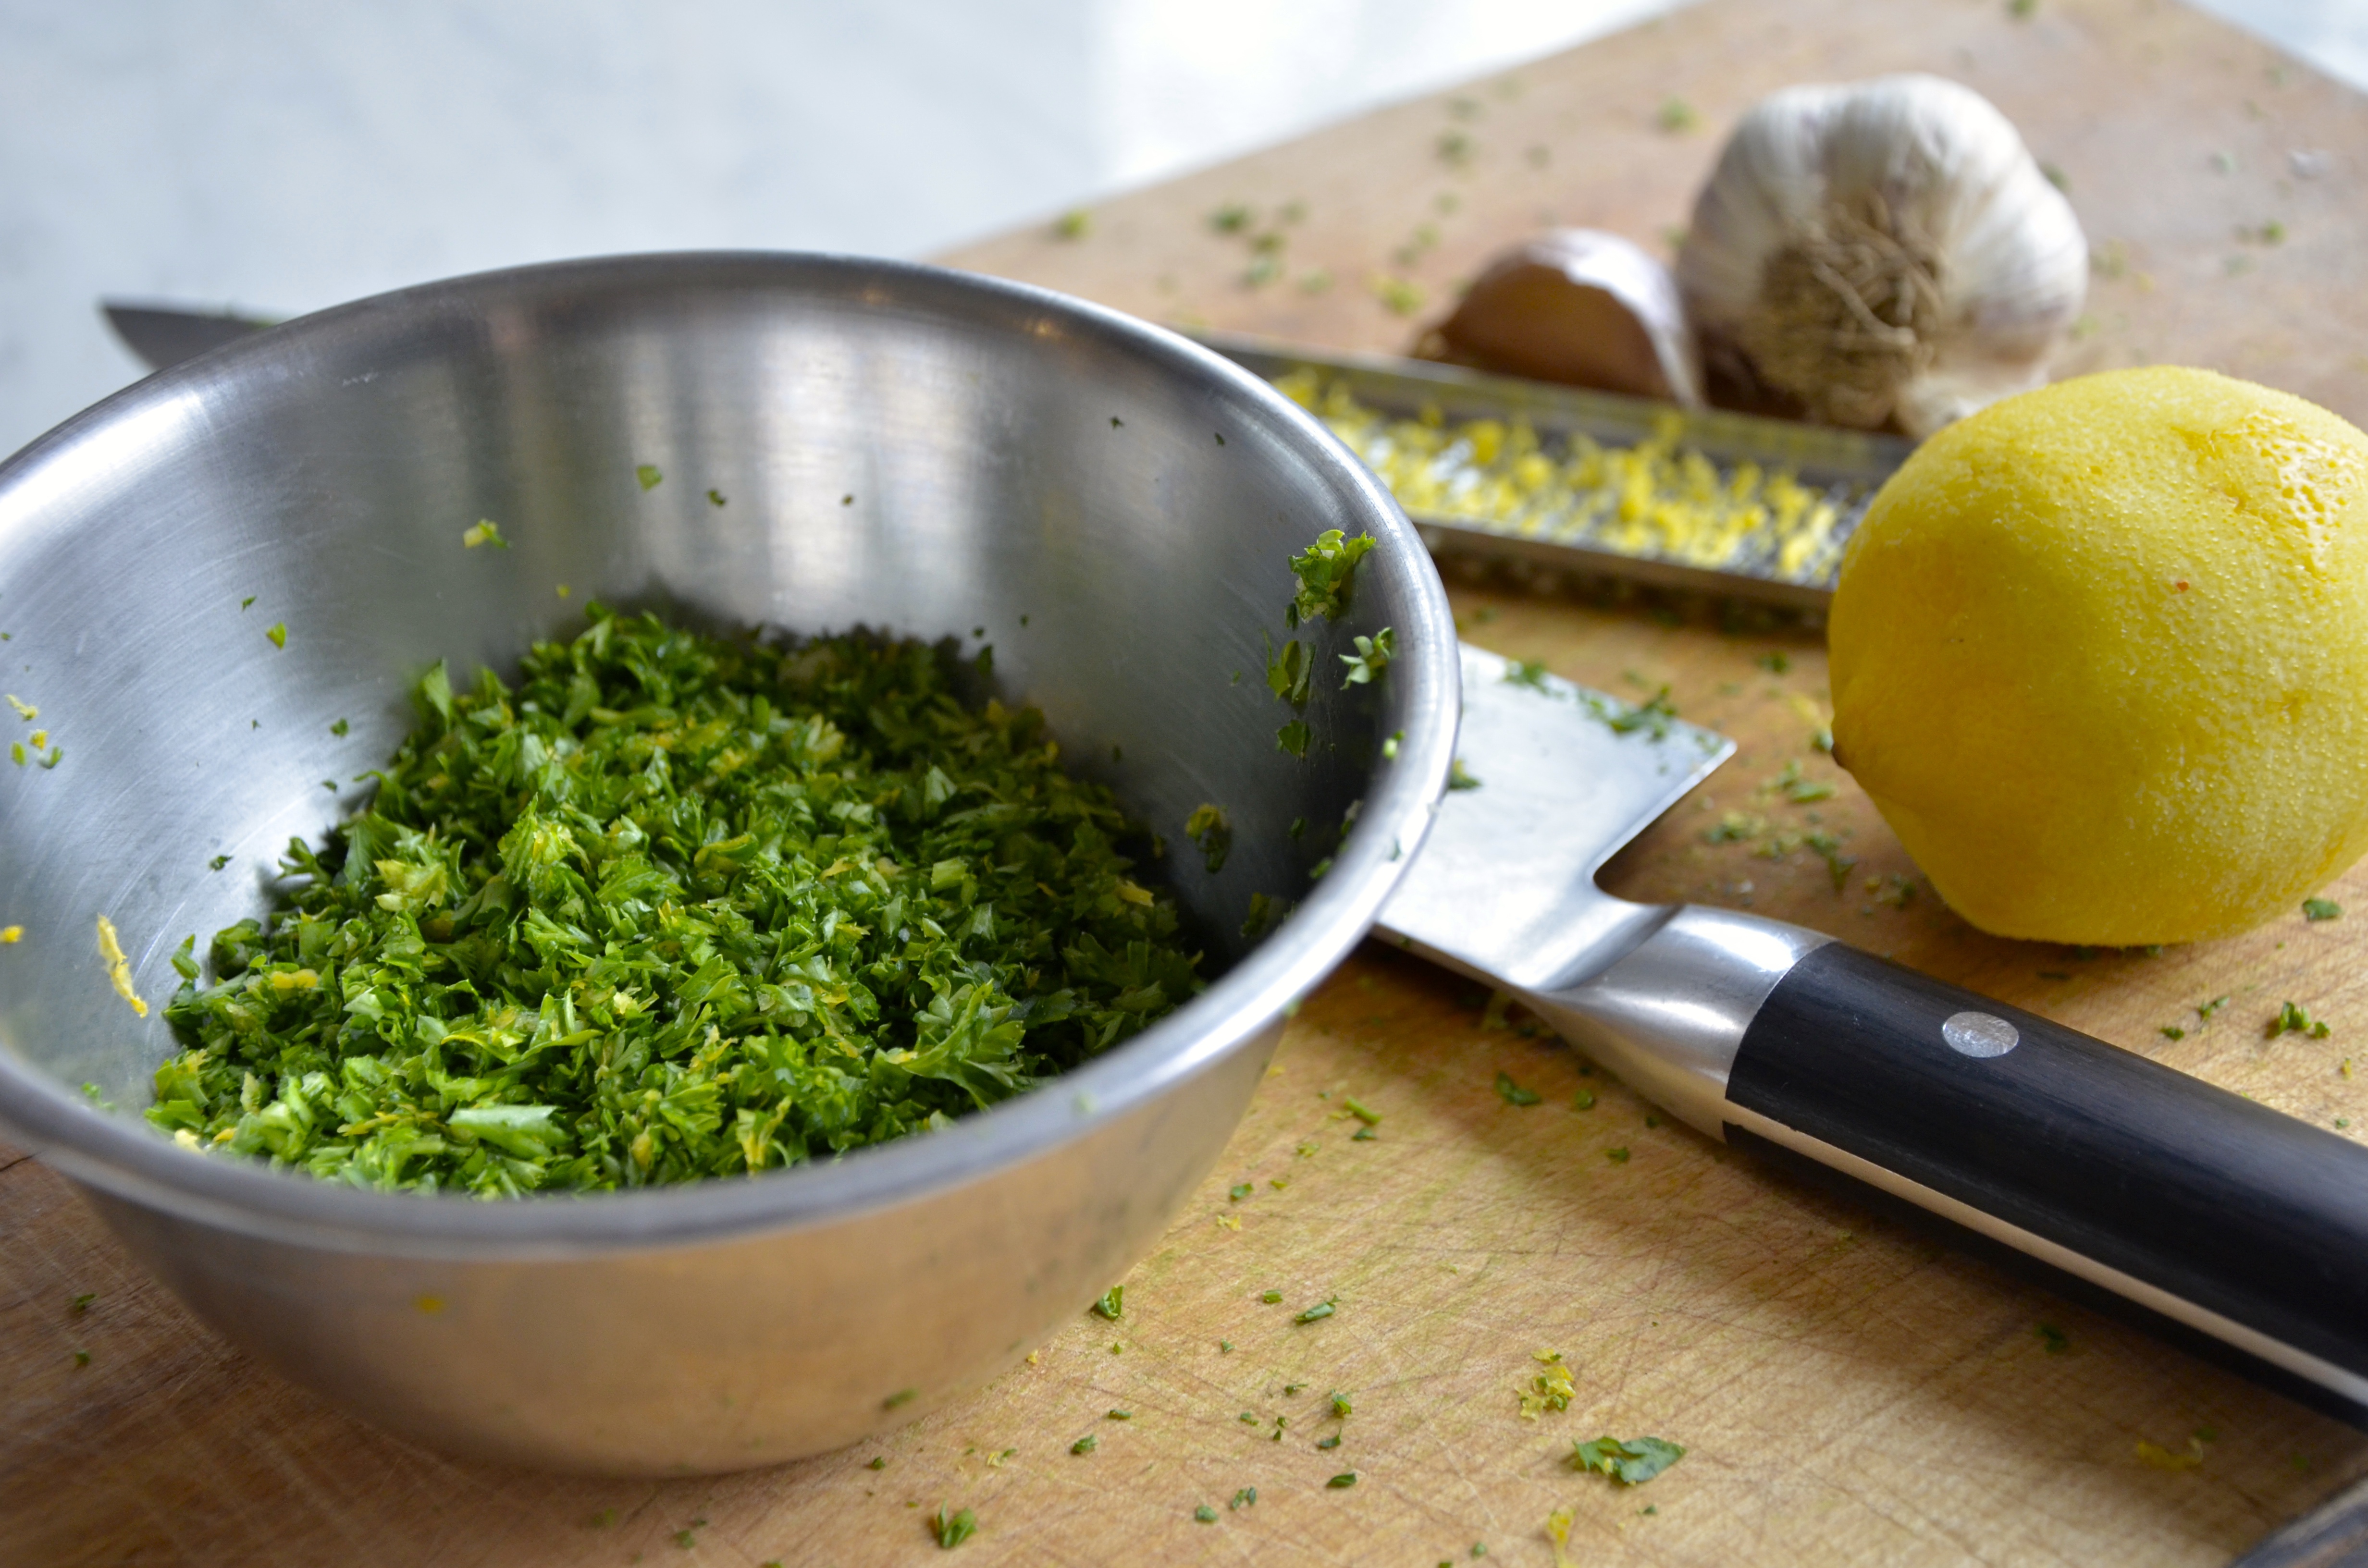
Gremolata is a traditional milanese condiment typically served with ossobuco alla milanese. With only 3 ingredients – lemon, parsley, and garlic – it’s fresh, zesty, and pungent so why limit its outings into the culinary world? It would be happy on this nossobuco vegan version of ossobuco. But it would be just as happy on pasta e fagioli, a fennel leek parsley risotto, or an end-of-winter vegetable stew. Bring it out whenever you need an extra guest at the party.
Handful of parsley, chopped
1 clove garlic, minced
Zest of 1 lemon
Wash and dry the parsley thoroughly. Chop the parsley coarsely on a chopping board. Add minced garlic and lemon zest to the pile. Continue to chop all 3 together until well-blended and the parsley is finely chopped. Mix with your hands a little more if needed.
mustardy farro and roasted winter vegetable salad
April 4, 2015

Technically it’s spring but given that the earth is still in a deep freeze here and that spring won’t really come to our plates for several months yet, our table is still adorned with winter vegetables. This recipe is a case in point. It’s a warm salad starring winter vegetables – carrots, parsnips, celeriac and cauliflower, with a solid supporting role given to farro – a warming hulled wheat grown in the Garfagnana region of Tuscany which can receive an IGP designation (Indicazione Geografica Protetta) by law guaranteeing its geographic origin. If you can’t find farro, barley is its identical twin. Topped with a little parsley and some toasted pine nuts, it takes centre stage nicely on its own, or accompanied by a little baked tofu or grilled chicken depending on your preference. It’s from Diana Henry’s new A Change of Appetite which I recommend picking up on your next visit to the library or local book store.
For the salad
6 carrots, trimmed, peeled and halved lengthwise (quartered if very fat)
3 parsnips, trimmed, peeled and halved lengthwise (quartered if very fat)
1/2 head of celeriac, peeled and cut into wedges
1/2 head of cauliflower, broken into small florets
3 tbsps olive oil
sea salt and black pepper
1 cup semi-pearl farro
1 tbsp olive oil
2 tsps white balsamic vinegar
2 tsps mixed seeds or nuts
For the dressing
1 tsp whole- grain mustard
1-2 tsps honey
5 tsps cider vinegar
1/2 cup olive oil
2 garlic cloves, minced
pinch of dried red pepper flakes
1 tbsp finely chopped parsley leaves
Preheat the oven to 375 degrees. Toss the carrots, parsnips, celeriac, and cauliflower with olive oil and a little sea salt and pepper. Transfer to a parchment-lined baking sheet in a single layer. Roast for approximately 40 minutes, or until tender and slightly burnished in patches.
Meanwhile, cook the farro. Put it into a saucepan and cover with plenty of cold water. Bring to a boil, then reduce the heat and cook for 20 – 25 minutes until tender (even when cooked it retains a bite in the centre). Drain and immediately dress with the olive oil, white balsamic vinegar, and seasoning.
To make the dressing, put the mustard, honey, and vinegar into a small bowl, season well, and whisk in the oil in a stream. Now mix in all the other dressing ingredients and taste.
Gently toss all the vegetables together with the farro and the dressing, adding any seeds or nuts you prefer.
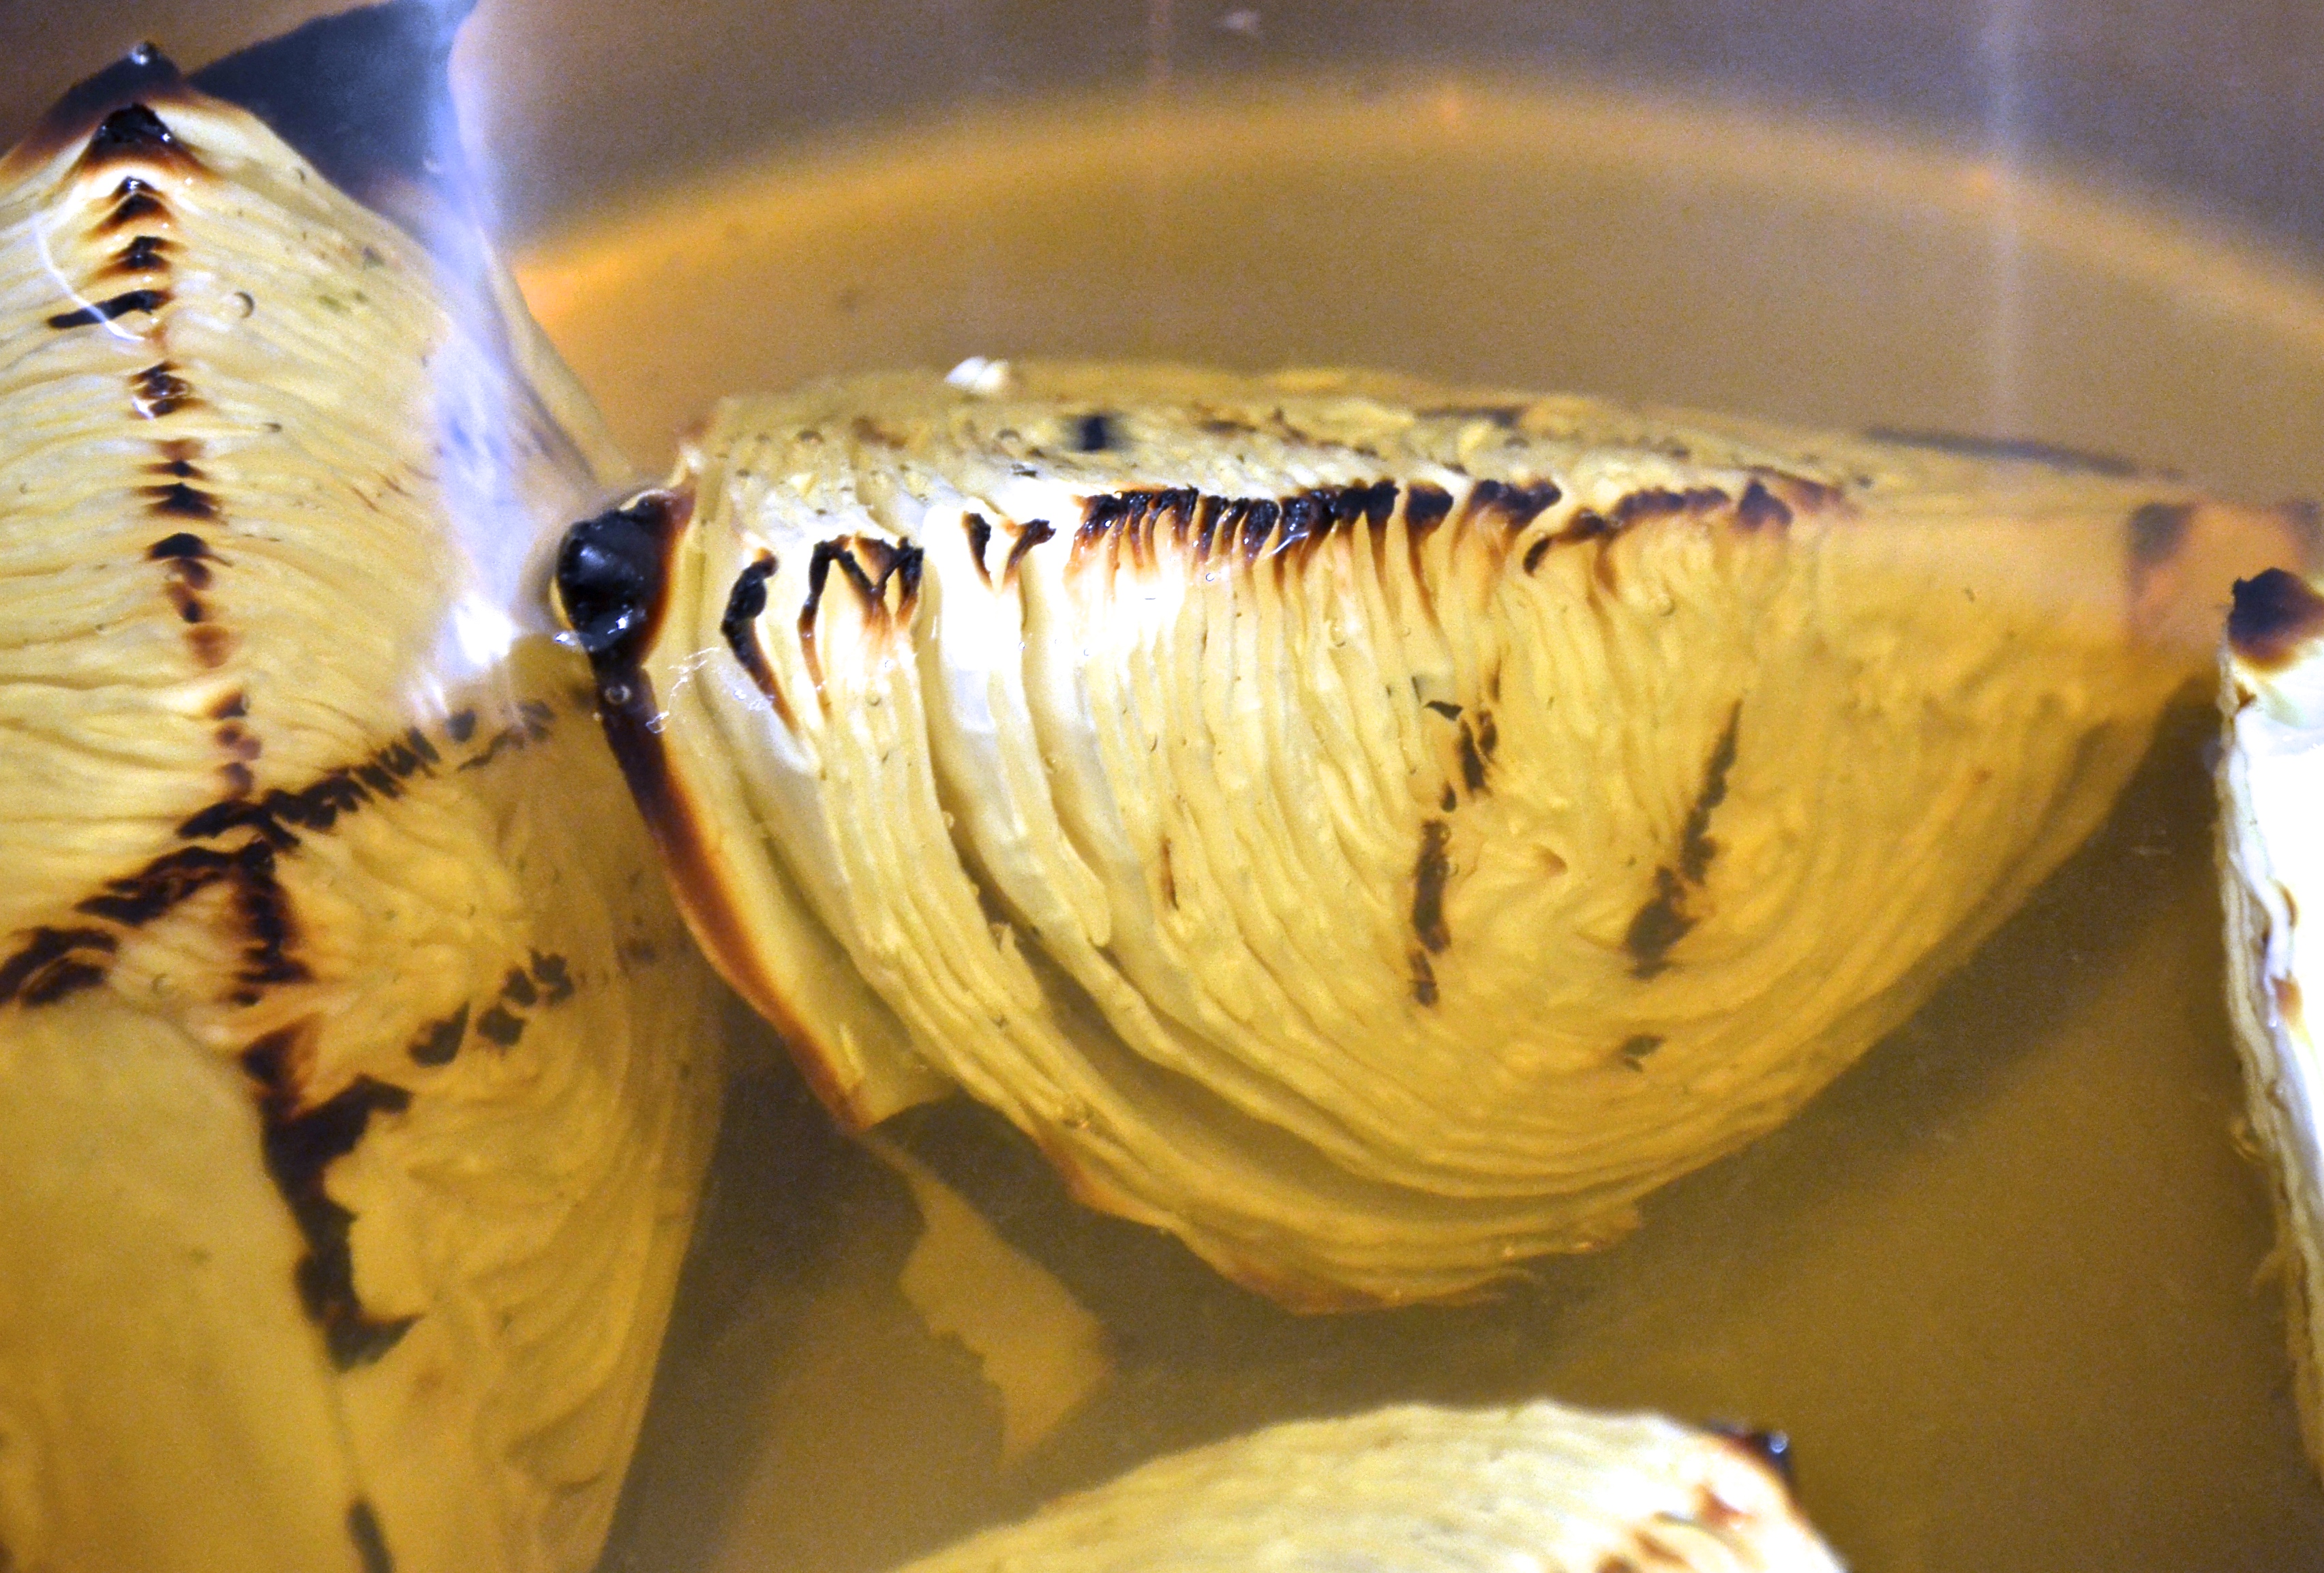
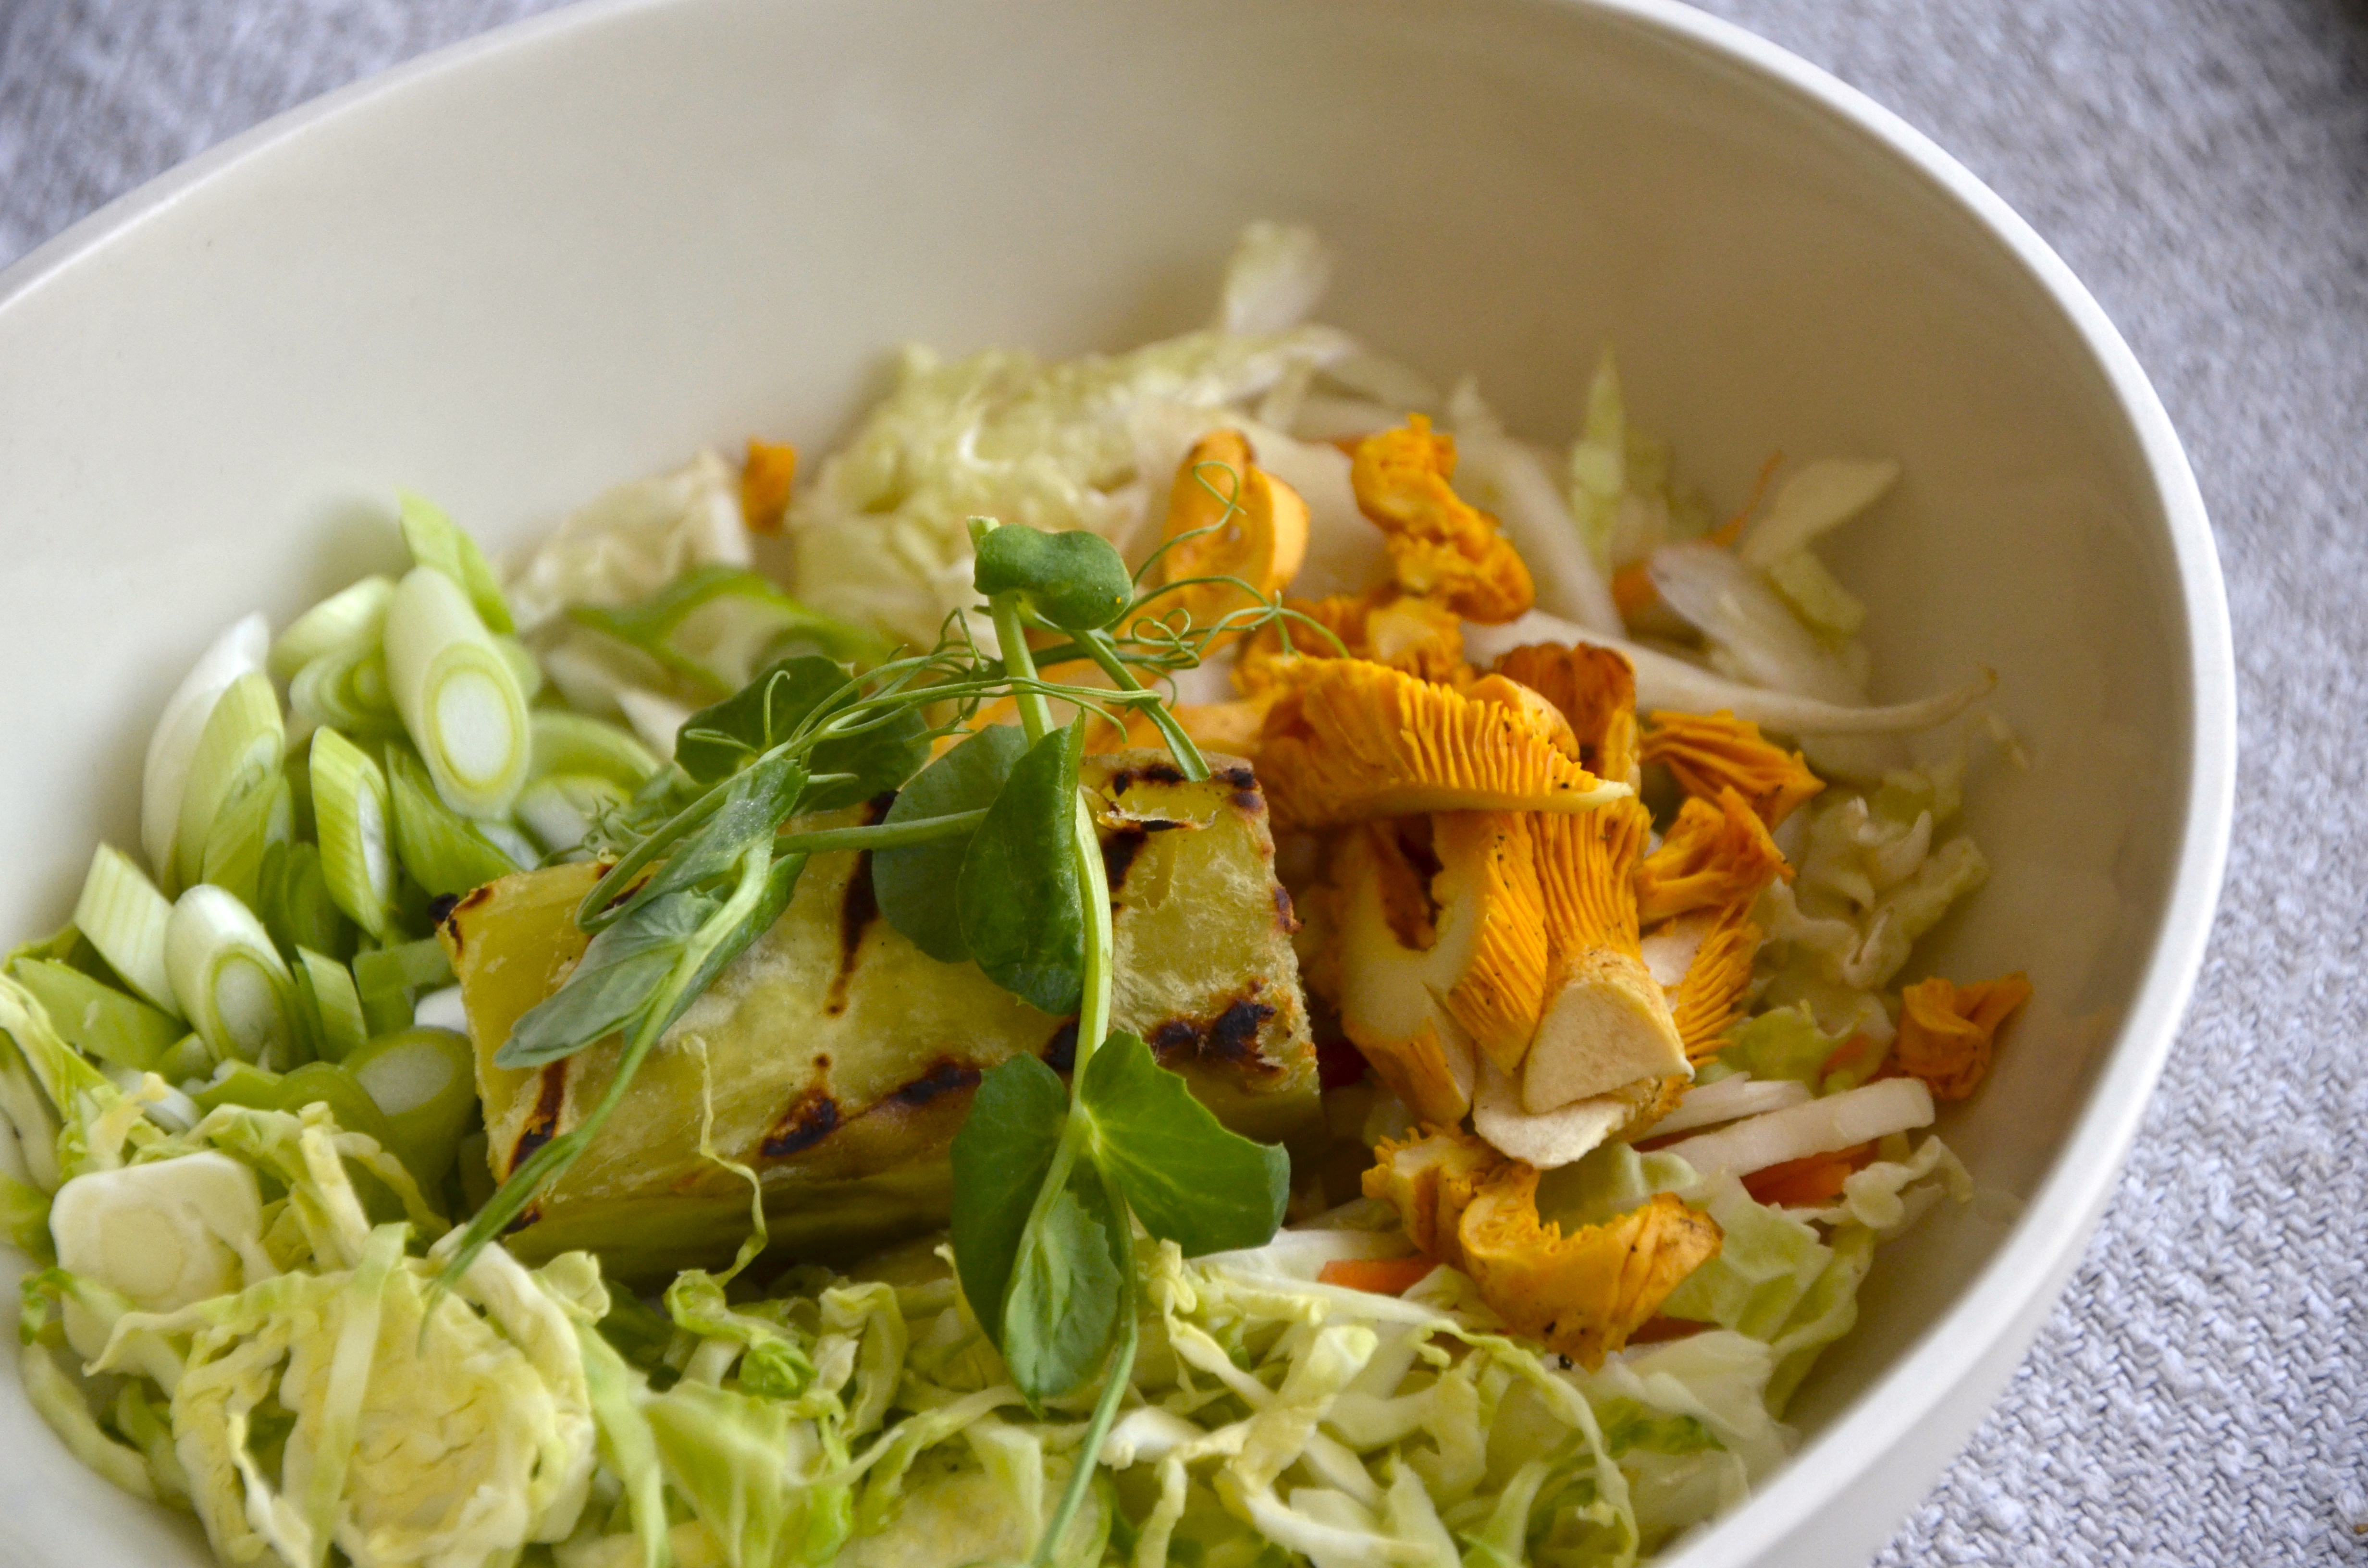
smoked cabbage soup with grilled satsumaimo
March 28, 2015
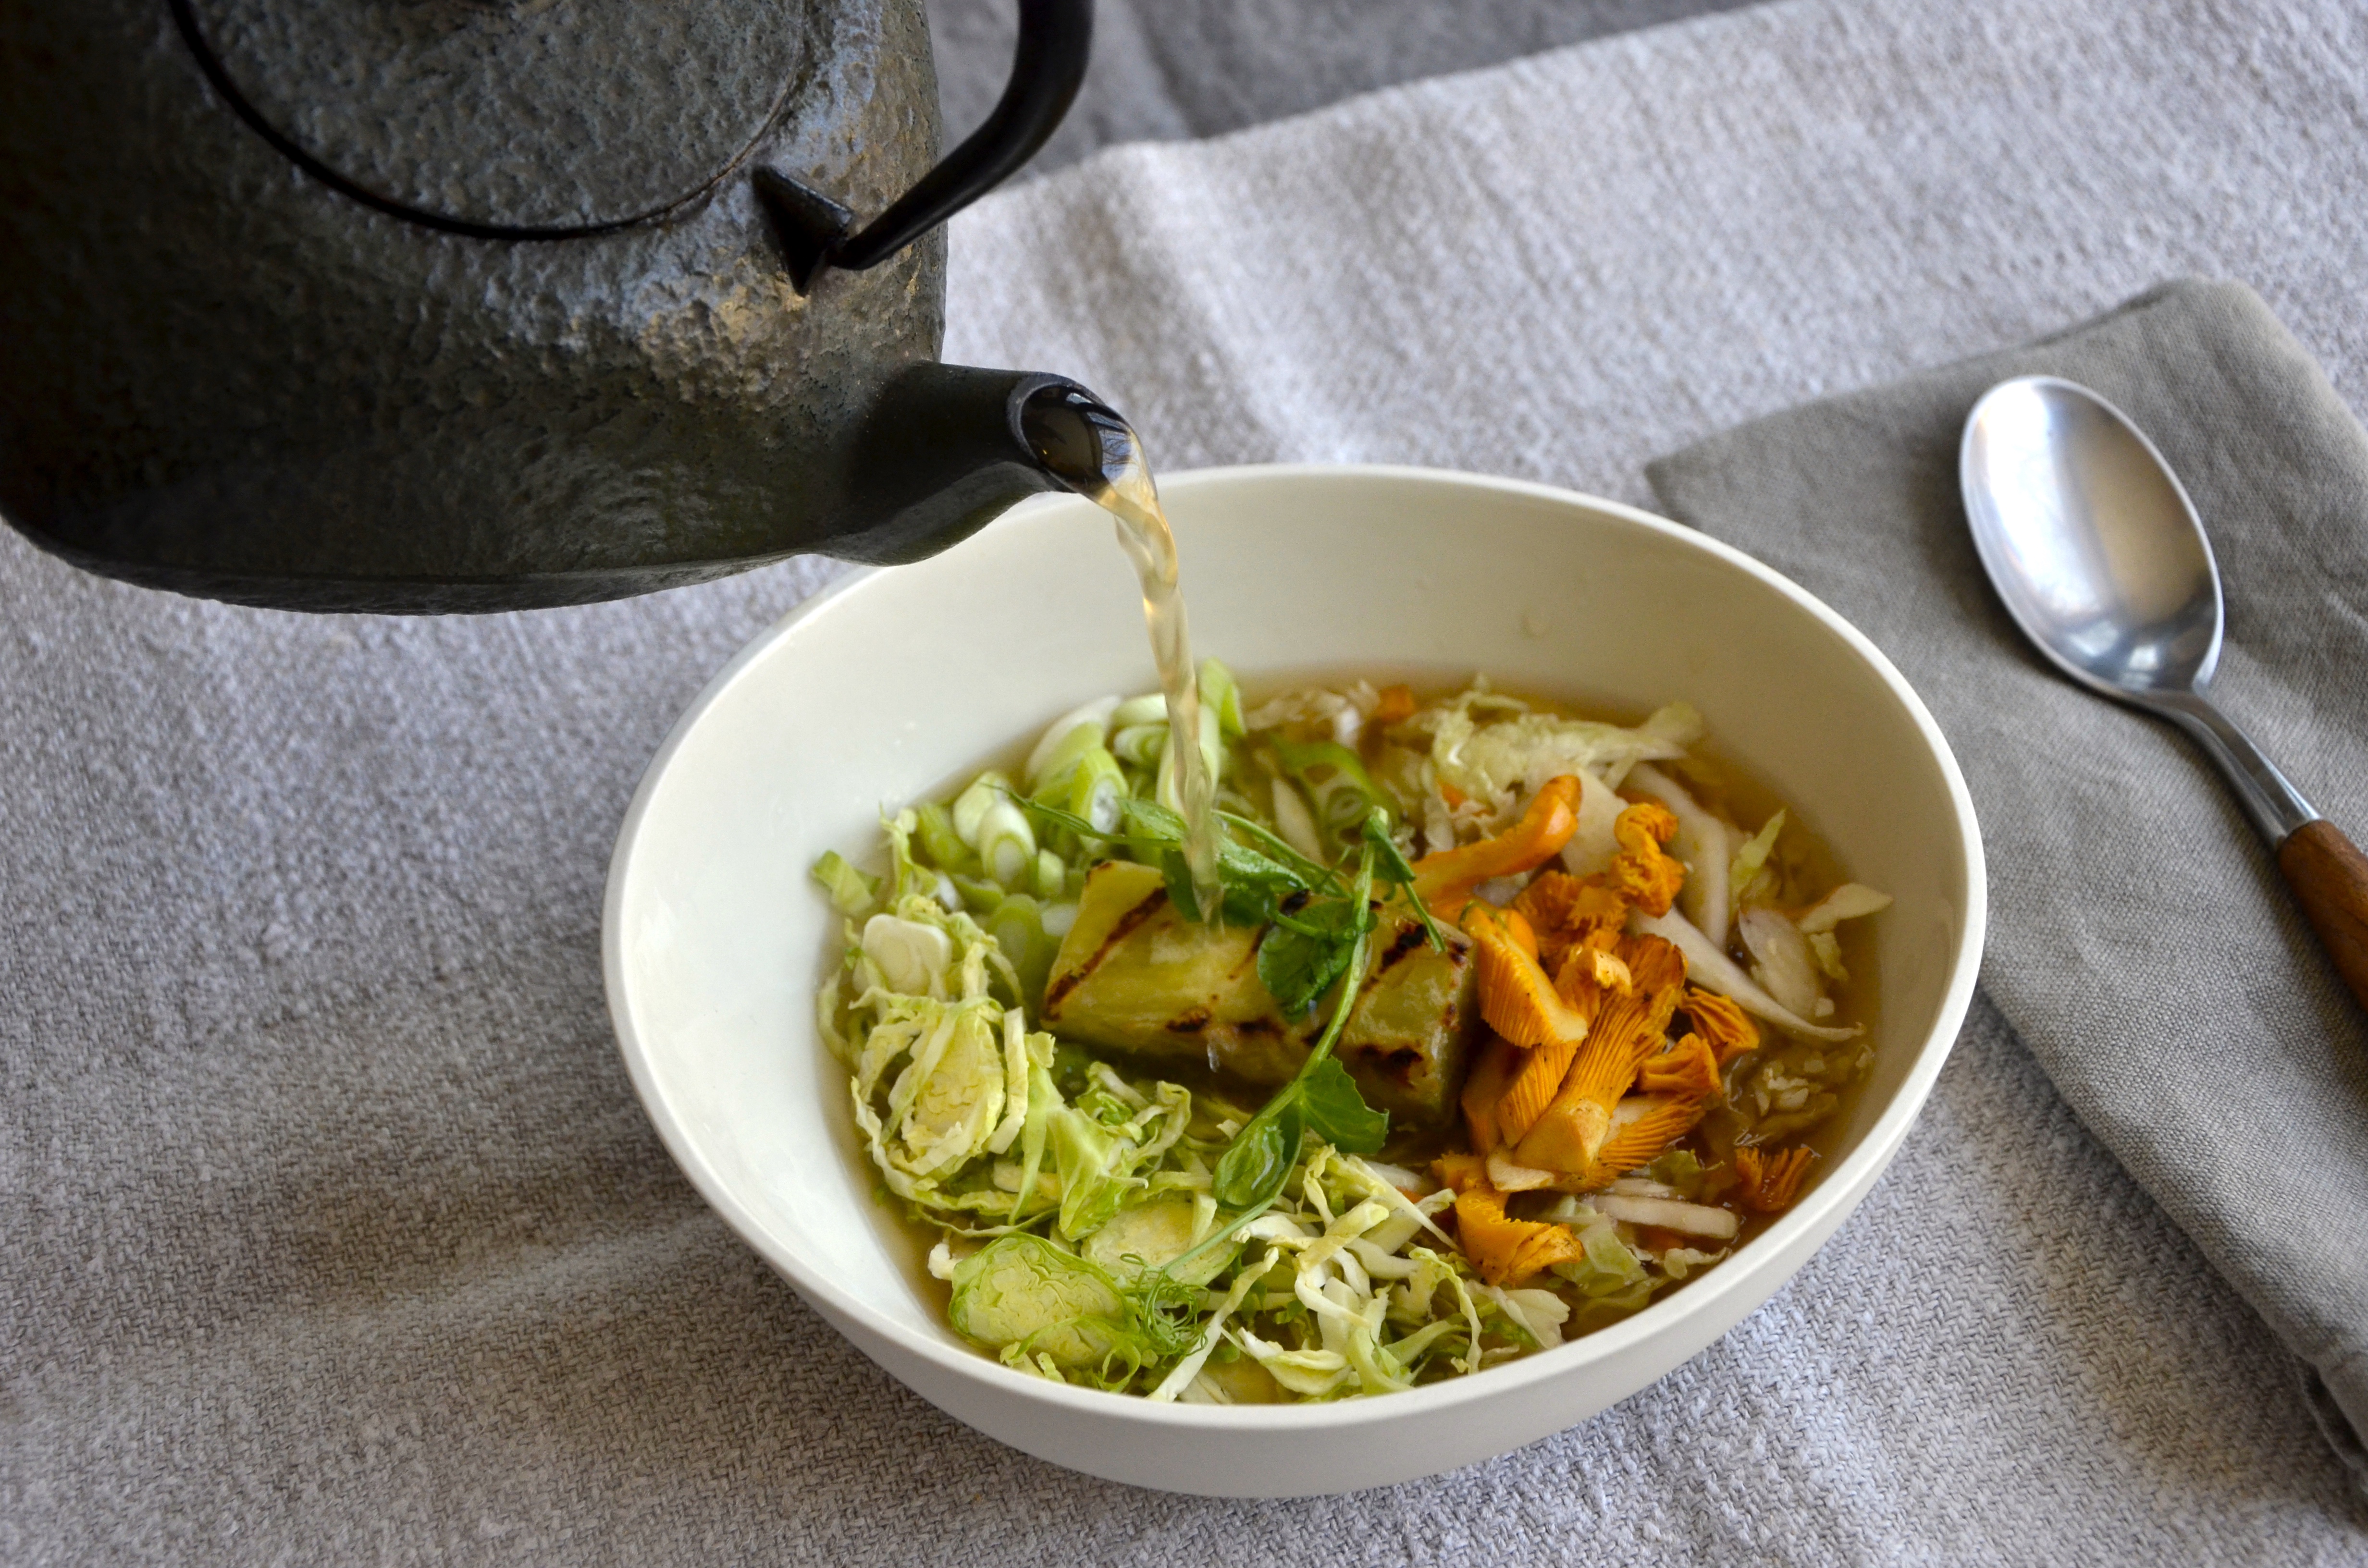
This recipe is quite a treat. Andrew and I were in NYC a couple of weeks ago and ate at The Gramercy Tavern for his birthday dinner. We had the vegetarian tasting menu. The main course was this simple but powerful smoked cabbage soup with raw vegetables and grilled Japanese sweet potato – or satsumaimo – unlike any soup I’ve eaten before. Lo and behold, we were invited into the kitchen at the end of dinner to meet the chef and we were given the broad outlines of the recipe. I’ve looked all over for a similar recipe and I can’t find one. So, you saw it here first. I have to admit that theirs was better but this one’s pretty damn good.
1 head cabbage, quartered
sea salt
1 tbsp olive oil
1 onion, sliced
2 cloves garlic, sliced finely
1 tbsp minced ginger
sprinkle of red pepper chili flakes
6 cups veggie stock
3 tbsps tamari sauce
1 1/2 tsps sherry vinegar
1 satsumaimo sweet potato, peeled and cut into large cubes
2 brussels sprouts, shaved finely
2 green onion, chopped finely
a handful of sliced cabbage, carrots, radishes or other vegetables of your choosing
2 chanterelle mushrooms, chopped coursly
tender green shoots
Preheat your BBQ to high. Add hickory (or any fruit wood) in a small smoking box to create a home-made smoking oven. Add the quartered cabbage and grill on all sides. Once it’s nicely browned, turn down the heat to low, salt the cabbage well, and smoke the cabbage for approximately 2 hours until it’s super tender and smokey. Leave the BBQ on low heat.
Meanwhile, heat olive oil in a large stock pot. Sauté onions until carmelized. Add garlic, minced ginger, and chili flakes and sauté for another 3-5 minutes until garlic is fragrant. Add vegetable stock, soy sauce, and smoked cabbage. Bring to a boil then turn down and simmer for approximately 45 minutes until the flavours meld. Strain and finish with the vinegar and salt and pepper to taste. Keep piping hot over the stove.
While your stock is cooking, prepare the satsumaimo sweet potato by peeling it and cutting it into large cubes. Brush with a little olive oil and grill in the BBQ on low heat until soft and charred on the outside.
Prepare your other vegetables and place them in the bottom of large soup bowls. Add the grilled satsumaimo. Finish with some tender shoots. Place vegetable bowls in front of hungry eaters and when everyone is seated and ready, pour smoked cabbage stock over the vegetables to the sounds of “oooohh” and “ahhhhhh.” Feel the satisfaction.
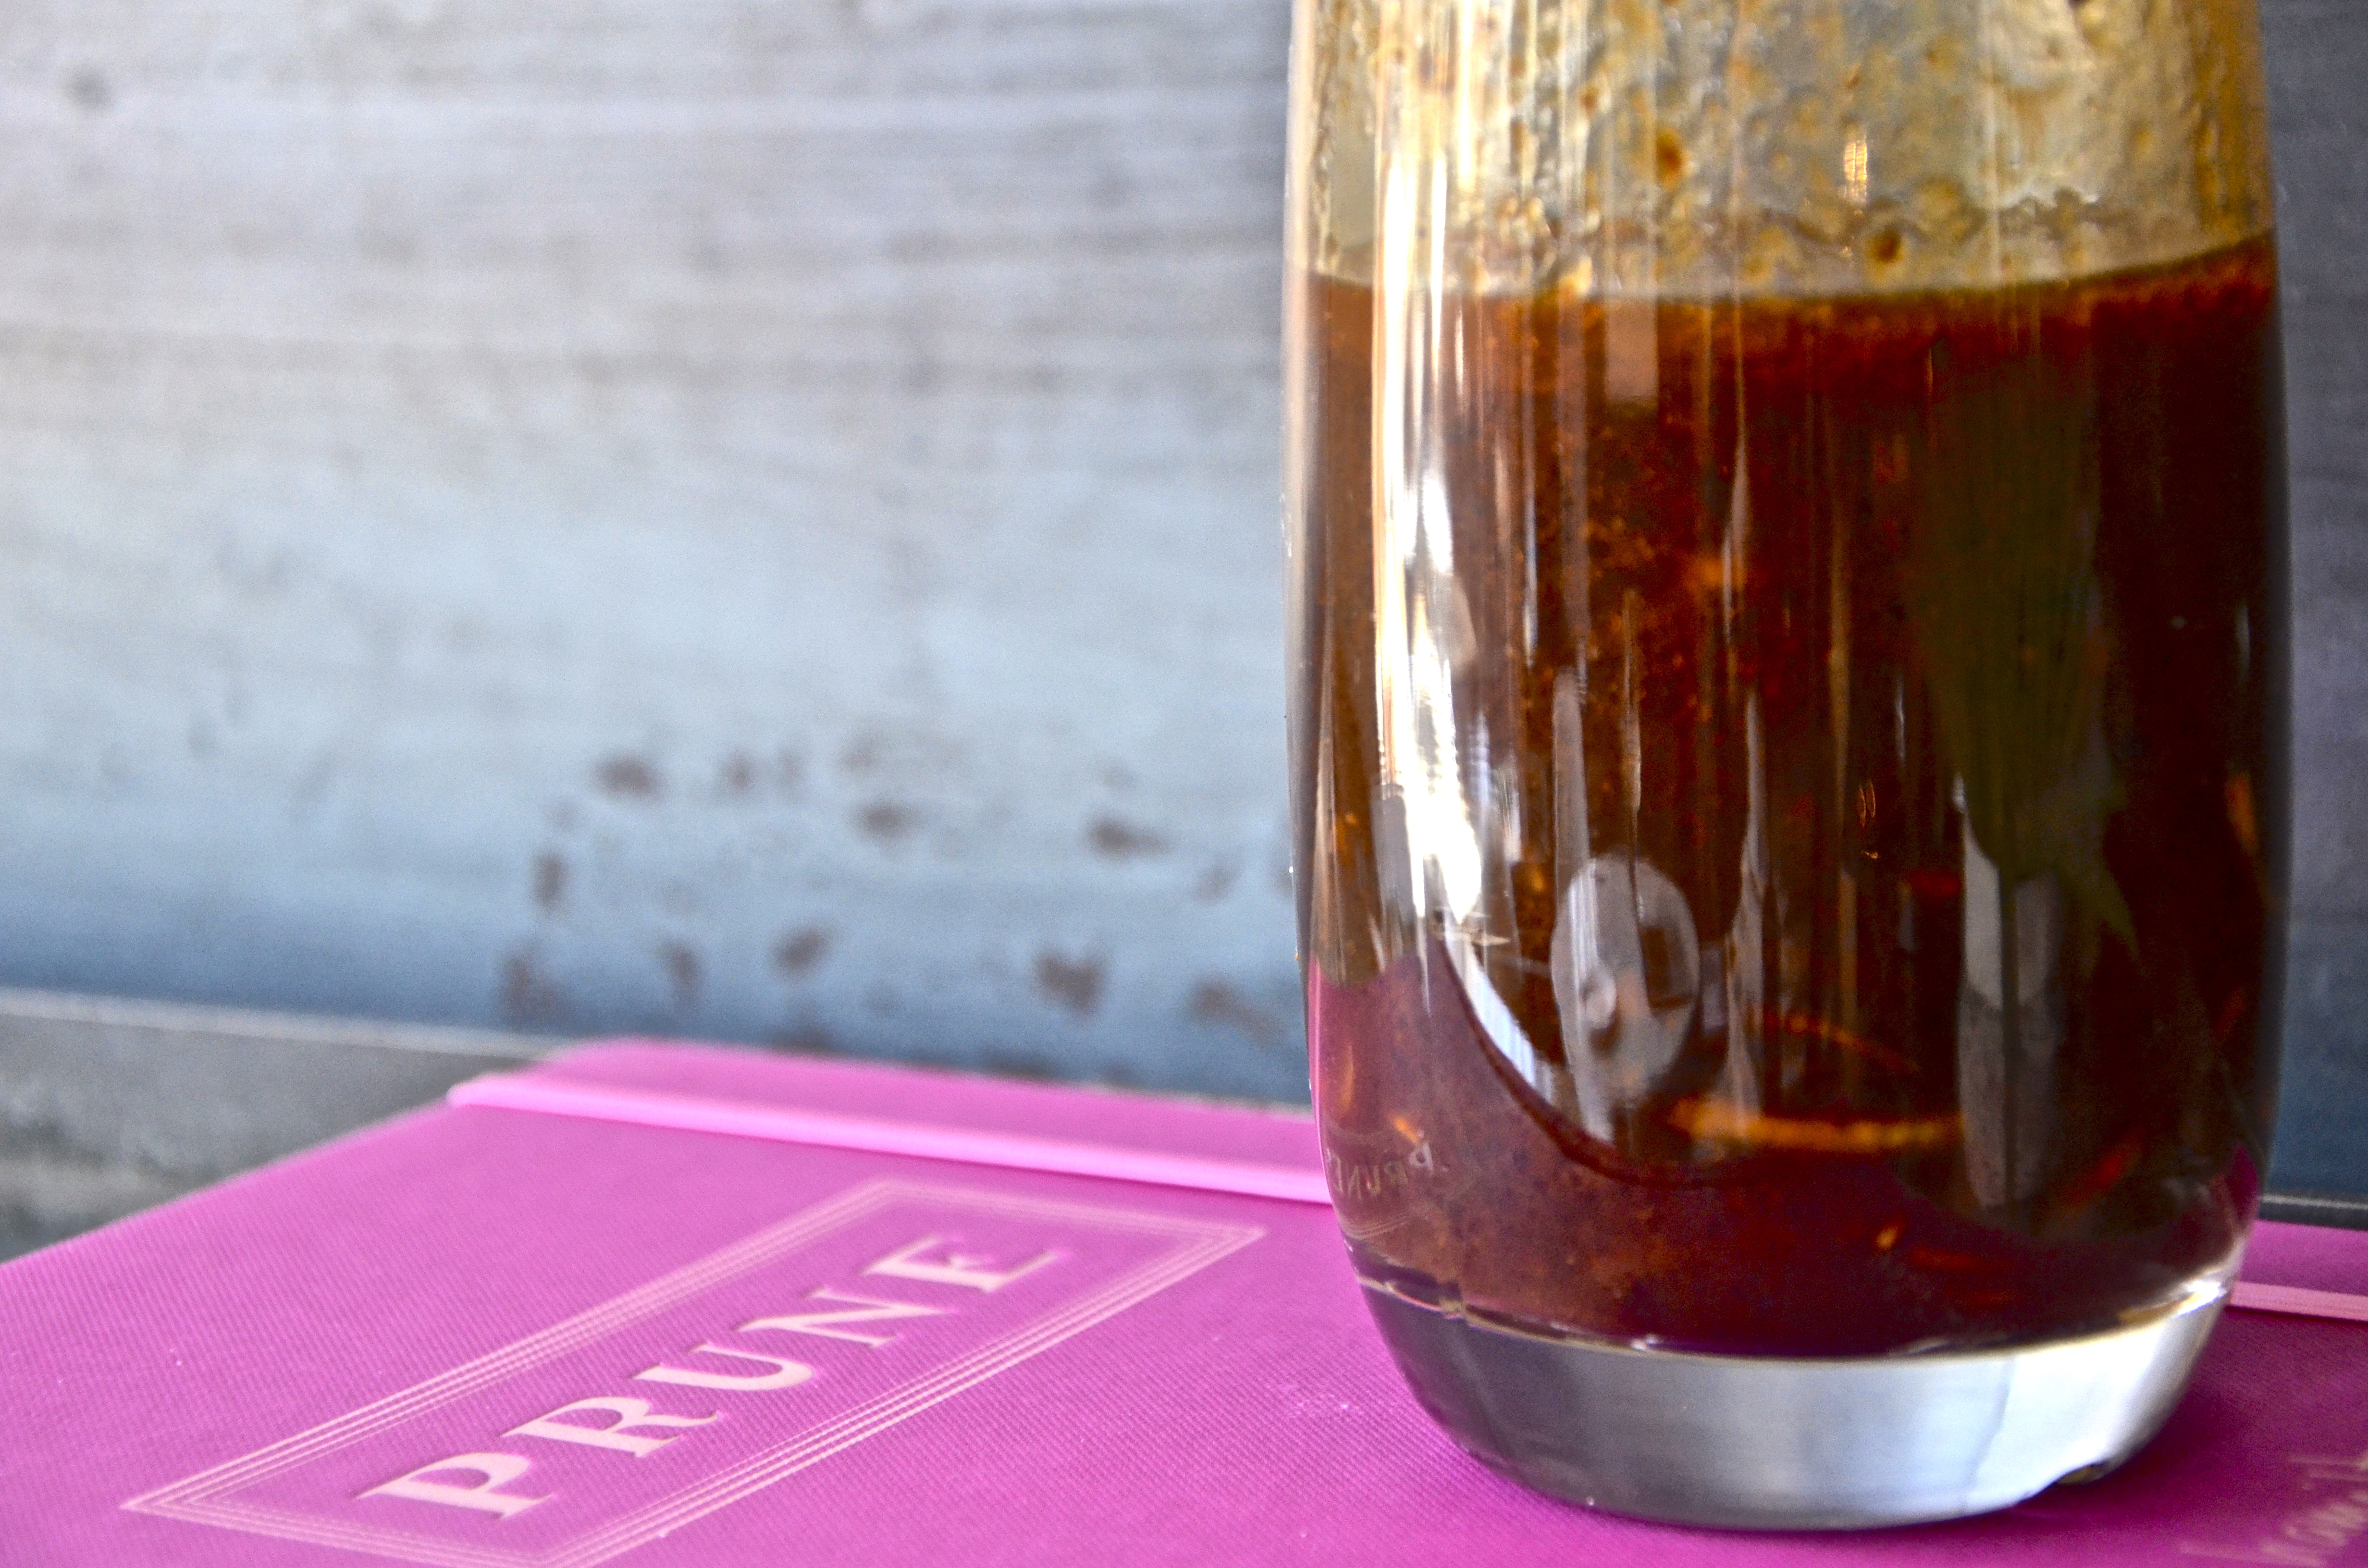
smoked tomato dressing
March 24, 2015
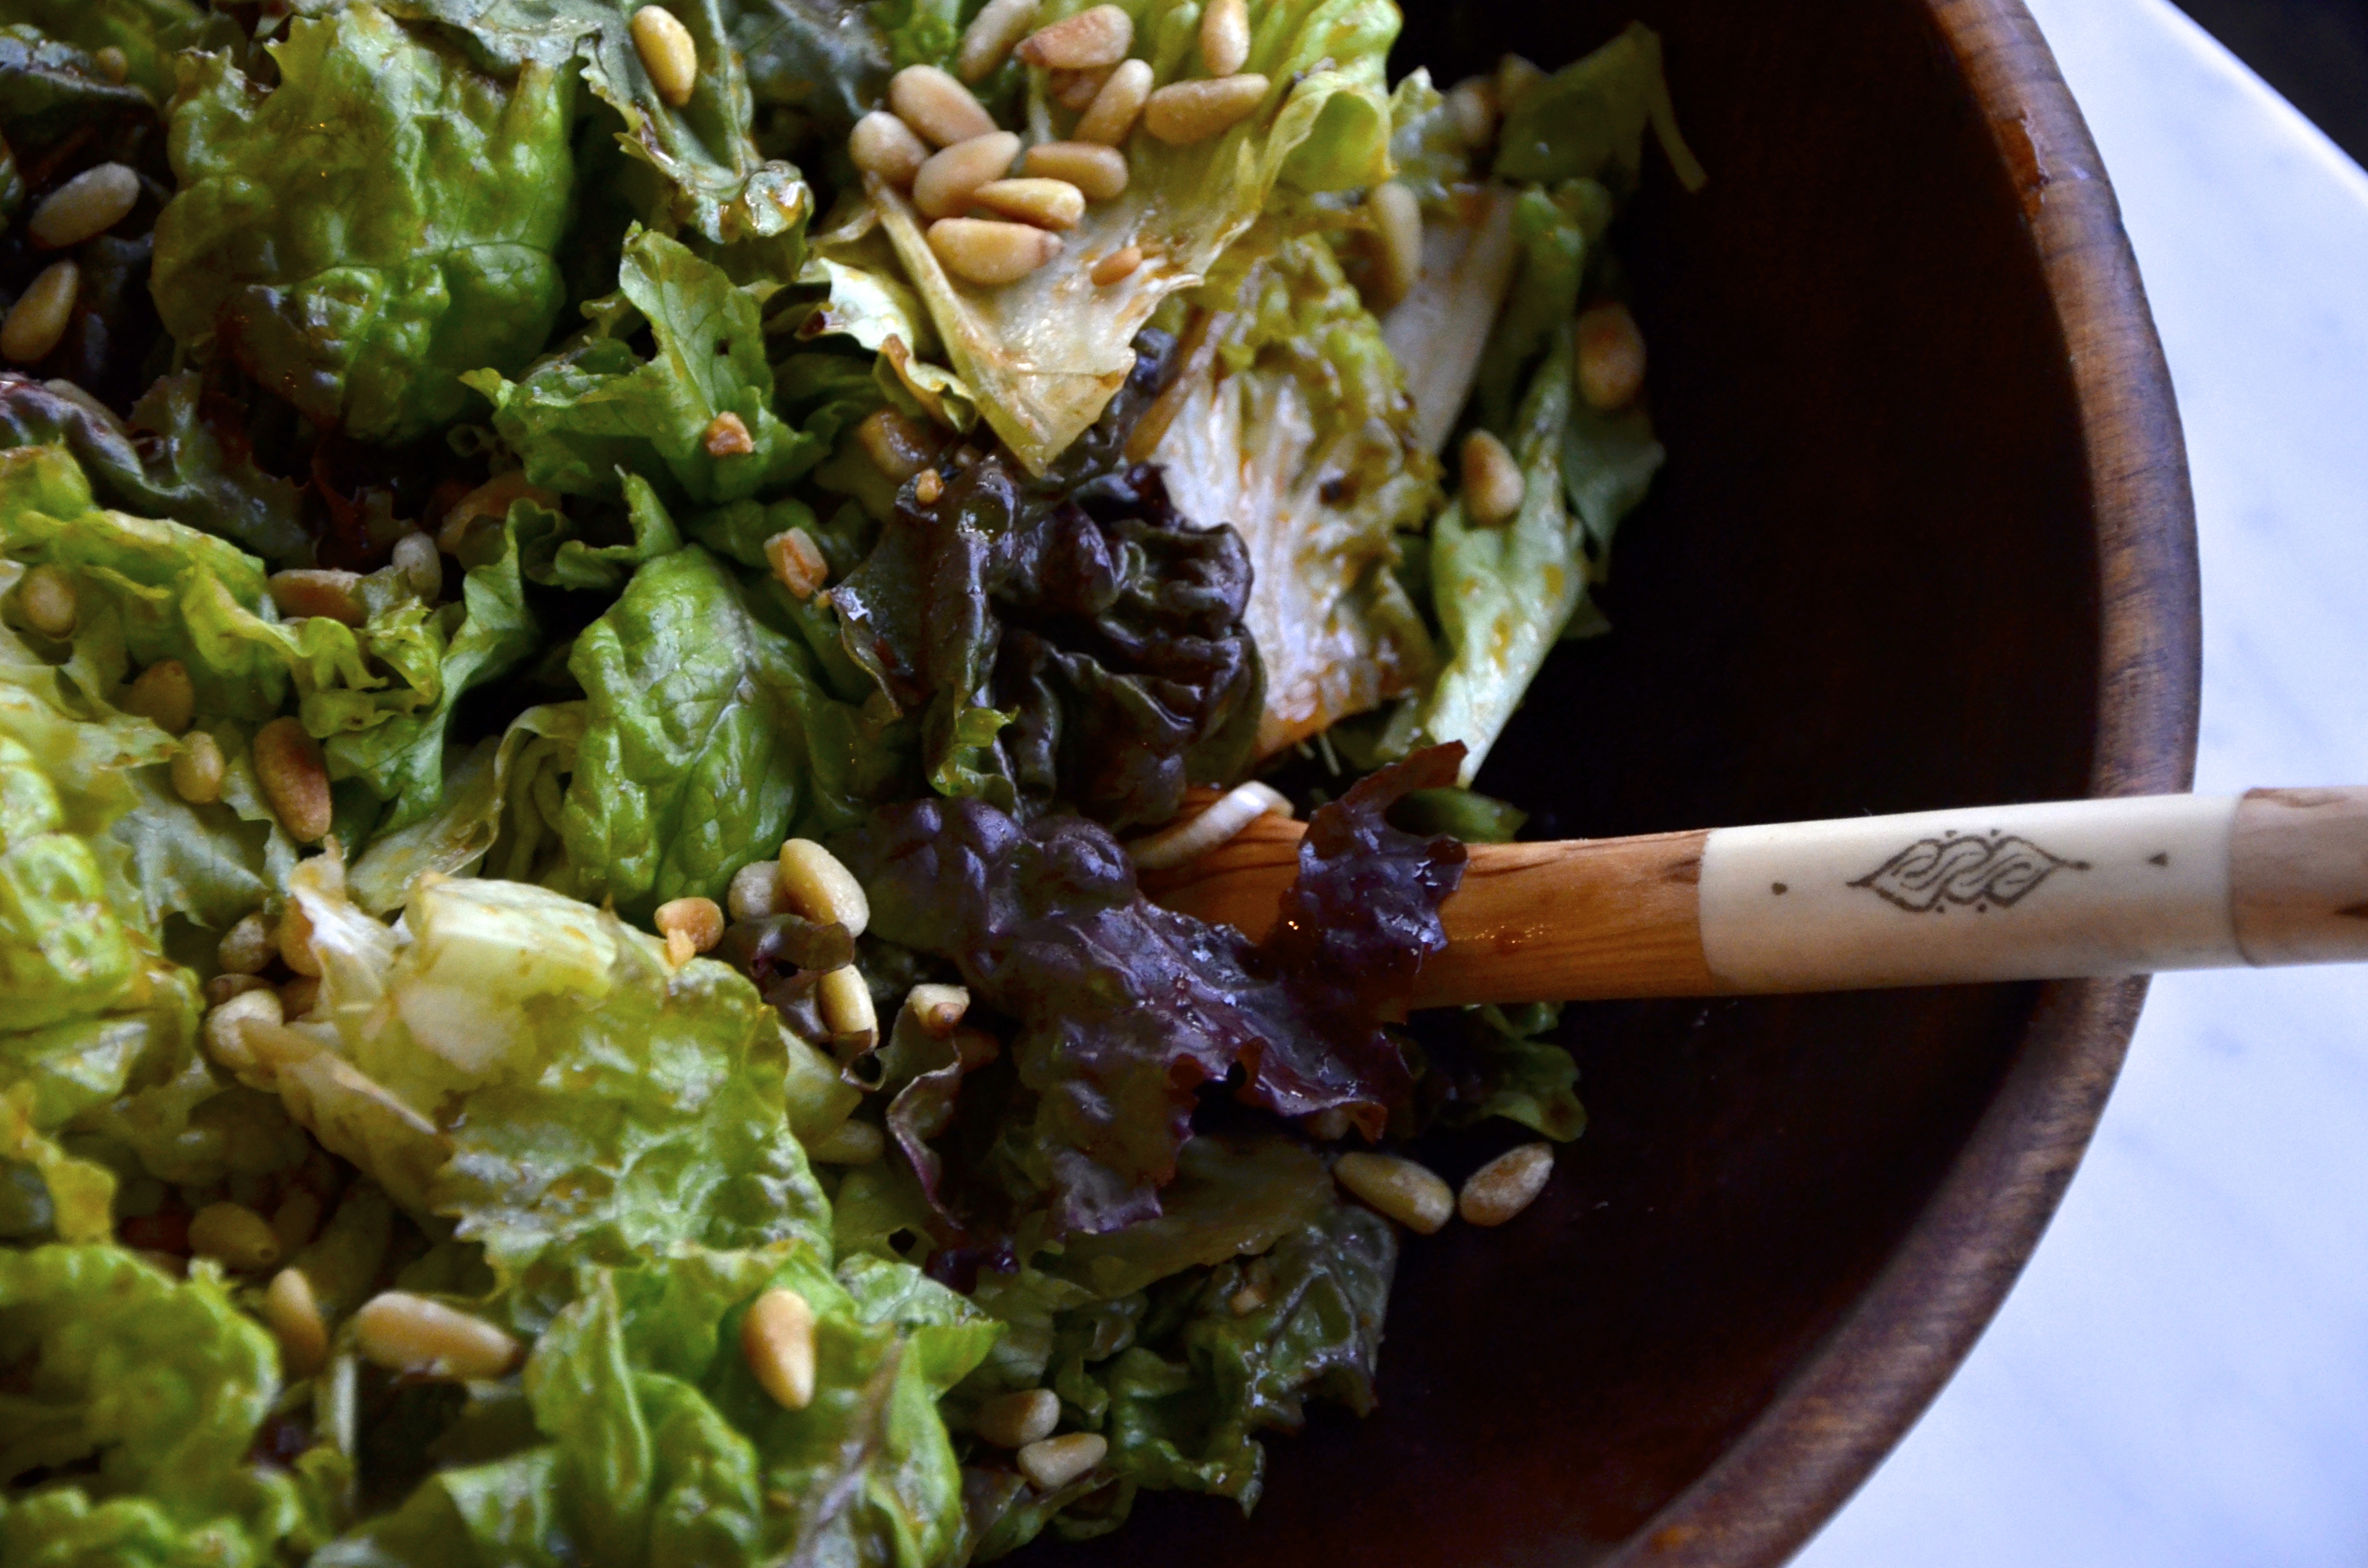
This is a fabulous smokey tomato dressing inspired by the relatively new cookbook Prune by celebrated NYC restauranteur Gabrielle Hamilton. Love the book. Love her attitude. And love her smokey dressing. She smokes her tomatoes in a smoker which most of us don’t have. So I’ve modified the recipe using smoked sun-dried tomatoes which I can get at the farmers’ market – and if you soak them in olive oil and then use the olive oil, you get an extra-smokey-bang-for-your-buck. I also substituted tomato juice for homemade tomato passata from last summer’s tomatoes. I don’t know what Prune’s tastes like but if it’s as good as my made-up re-do, your greens will be screaming for more.
2 shallots, peeled and sliced into very thin rings
8 – 10 smoked sun-dried tomatoes
1 cup extra virgin olive oil, preferably having soaked the smoked sun-dried tomatoes
1/2 cup tomato juice or passata
1/4 cup balsamic vinegar
2 tbsps aged sherry vinegar
1 tbsp fresh lemon juice
sea salt
freshly ground black pepper
Toss the shallots with a few pinches of salt in stainless steel bowl. Use your fingers to break up the rings and let the salt briefly tame their bite.
Put sun-dried tomatoes, olive oil and passata in a blender and blend until smooth.
Transfer tomato mixture from the blender to a mixing bowl. With a spoon, stir together tomato mixture, vinegars, and lemon juice.
Season with a good dose of black pepper and a careful bit of sea salt. Serve over tender greens with any toppings that come to mind – toasted pine nuts, green onions, shredded carrot or sliced cucumbers.
blackberry nut bread
March 19, 2015
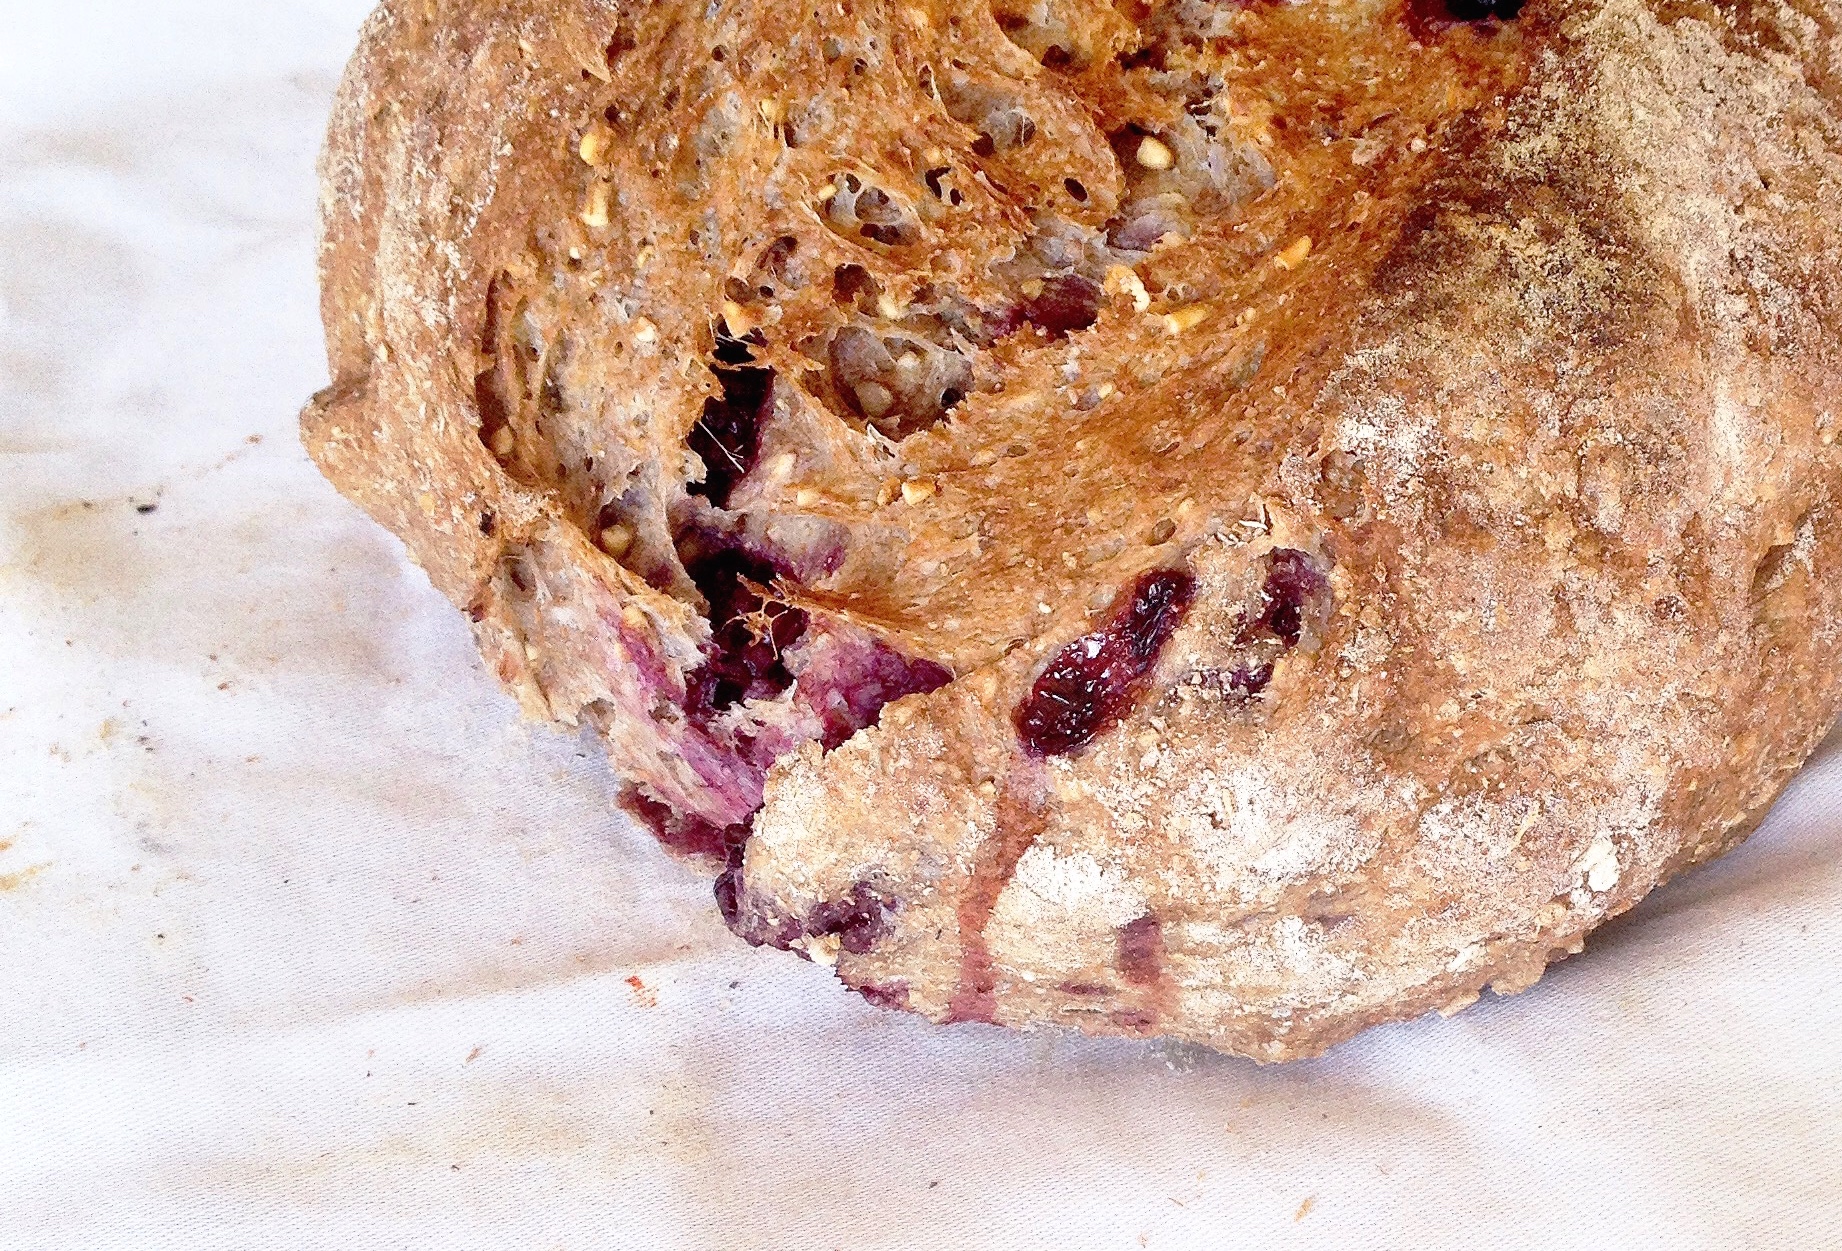
My daughter Rebekah has always loved baking. Perhaps it’s because she comes from a long line of bakers. My grandmother made 9 loaves of bread every Saturday in her farm kitchen. My mother loved baking. My sisters bake. I’ve got the baking gene. So she comes by it honestly, and she’s a good baker and only got better with a short stint at Blackbird Baking Co. last summer. So in her spare time in residence at UNBC she bakes, naturally. She fired up this blackberry nut bread inspired by engrained last week and sent me the photo and a full report. Yowzah! Her great-grandmother has to be proud.

Rebekah with her great-grandmother and brother, Joshua, on the farm
2 1/2 cup bread flour
1/2 cup spelt flour
1/2 cup steel cut oats, toasted
1 1/2 tsp salt
3/4 tsp active dry yeast
1/2 cup blackberries
1 cup toasted nuts
1/3 cup maple syrup
1 3/4 cup water
Lightly toast oats in a dry saucepan over medium heat, let cool. In a large bowl combine flours, yeast, salt, and toasted oats. Add blackberries and nuts. Add water and maple syrup. Stir with your hand or a wooden spoon until just incorporated. Dough should be sticky and shaggy. If not add a tablespoon of bread flour or water until it is wet and sticky.
Cover bowl with a tea towel and let sit for 12 – 18 hours at a warm room temperature. Overnight on your stove top is a good way to go.
After 12 – 18 hours, dust your work surface generously with flour. Scrape your dough out onto your surface in one piece – the dough should be loose and sticky. Sprinkle with a bit of flour and then fold the dough over on itself twice. Cover with a tea towel and let sit for 15 more minutes.
Dust your hands with flour, making sure your work surface is still generously coated, and then lift the edges of your dough and tuck them into the centre until the dough is a round shape. Turn the dough over and gently roll it into a ball. Take your tea towel and generously coat it with flour. Place the dough into the towel with seam (tucked edges) facing down and then dust the top with more flour. Fold the towel loosely over the dough and place it in a warm location.
30 minutes before the end of the second rise, preheat the oven with cast iron pot to 450 degrees. Let heat for 30 minutes. While heating the cast iron, put a baking tray or deep pan underneath. Just before closing the oven to bake, dump a bunch of water into the tray. This will create steam allowing the bread to rise before the crust forms. Take pot from oven.
Slide your hand under the towel and turn over. Uncover and quickly/gently/safely turn dough over into the pot so that the seam is facing up. It may be a bit messy but that’s okay. Right before you put it in the oven, slash the dough cutting at an angle with the surface of the dough. Cover with lid and bake 30 minutes. Then uncover and bake for another 10 minutes, or until loaf is the color you like. Lift bread out of pot and let cool on cooling rack. One way to check if it’s done is to knock the bottom. If it sounds hollow, you should be good.
Fight the urge to cut the bread before it’s cooled!!! Slicing the bread too early will result in a doughy/mushy inside. Give it lots of love and it will be happy bread!
lentil celeriac herb salad with hazelnuts
February 28, 2015
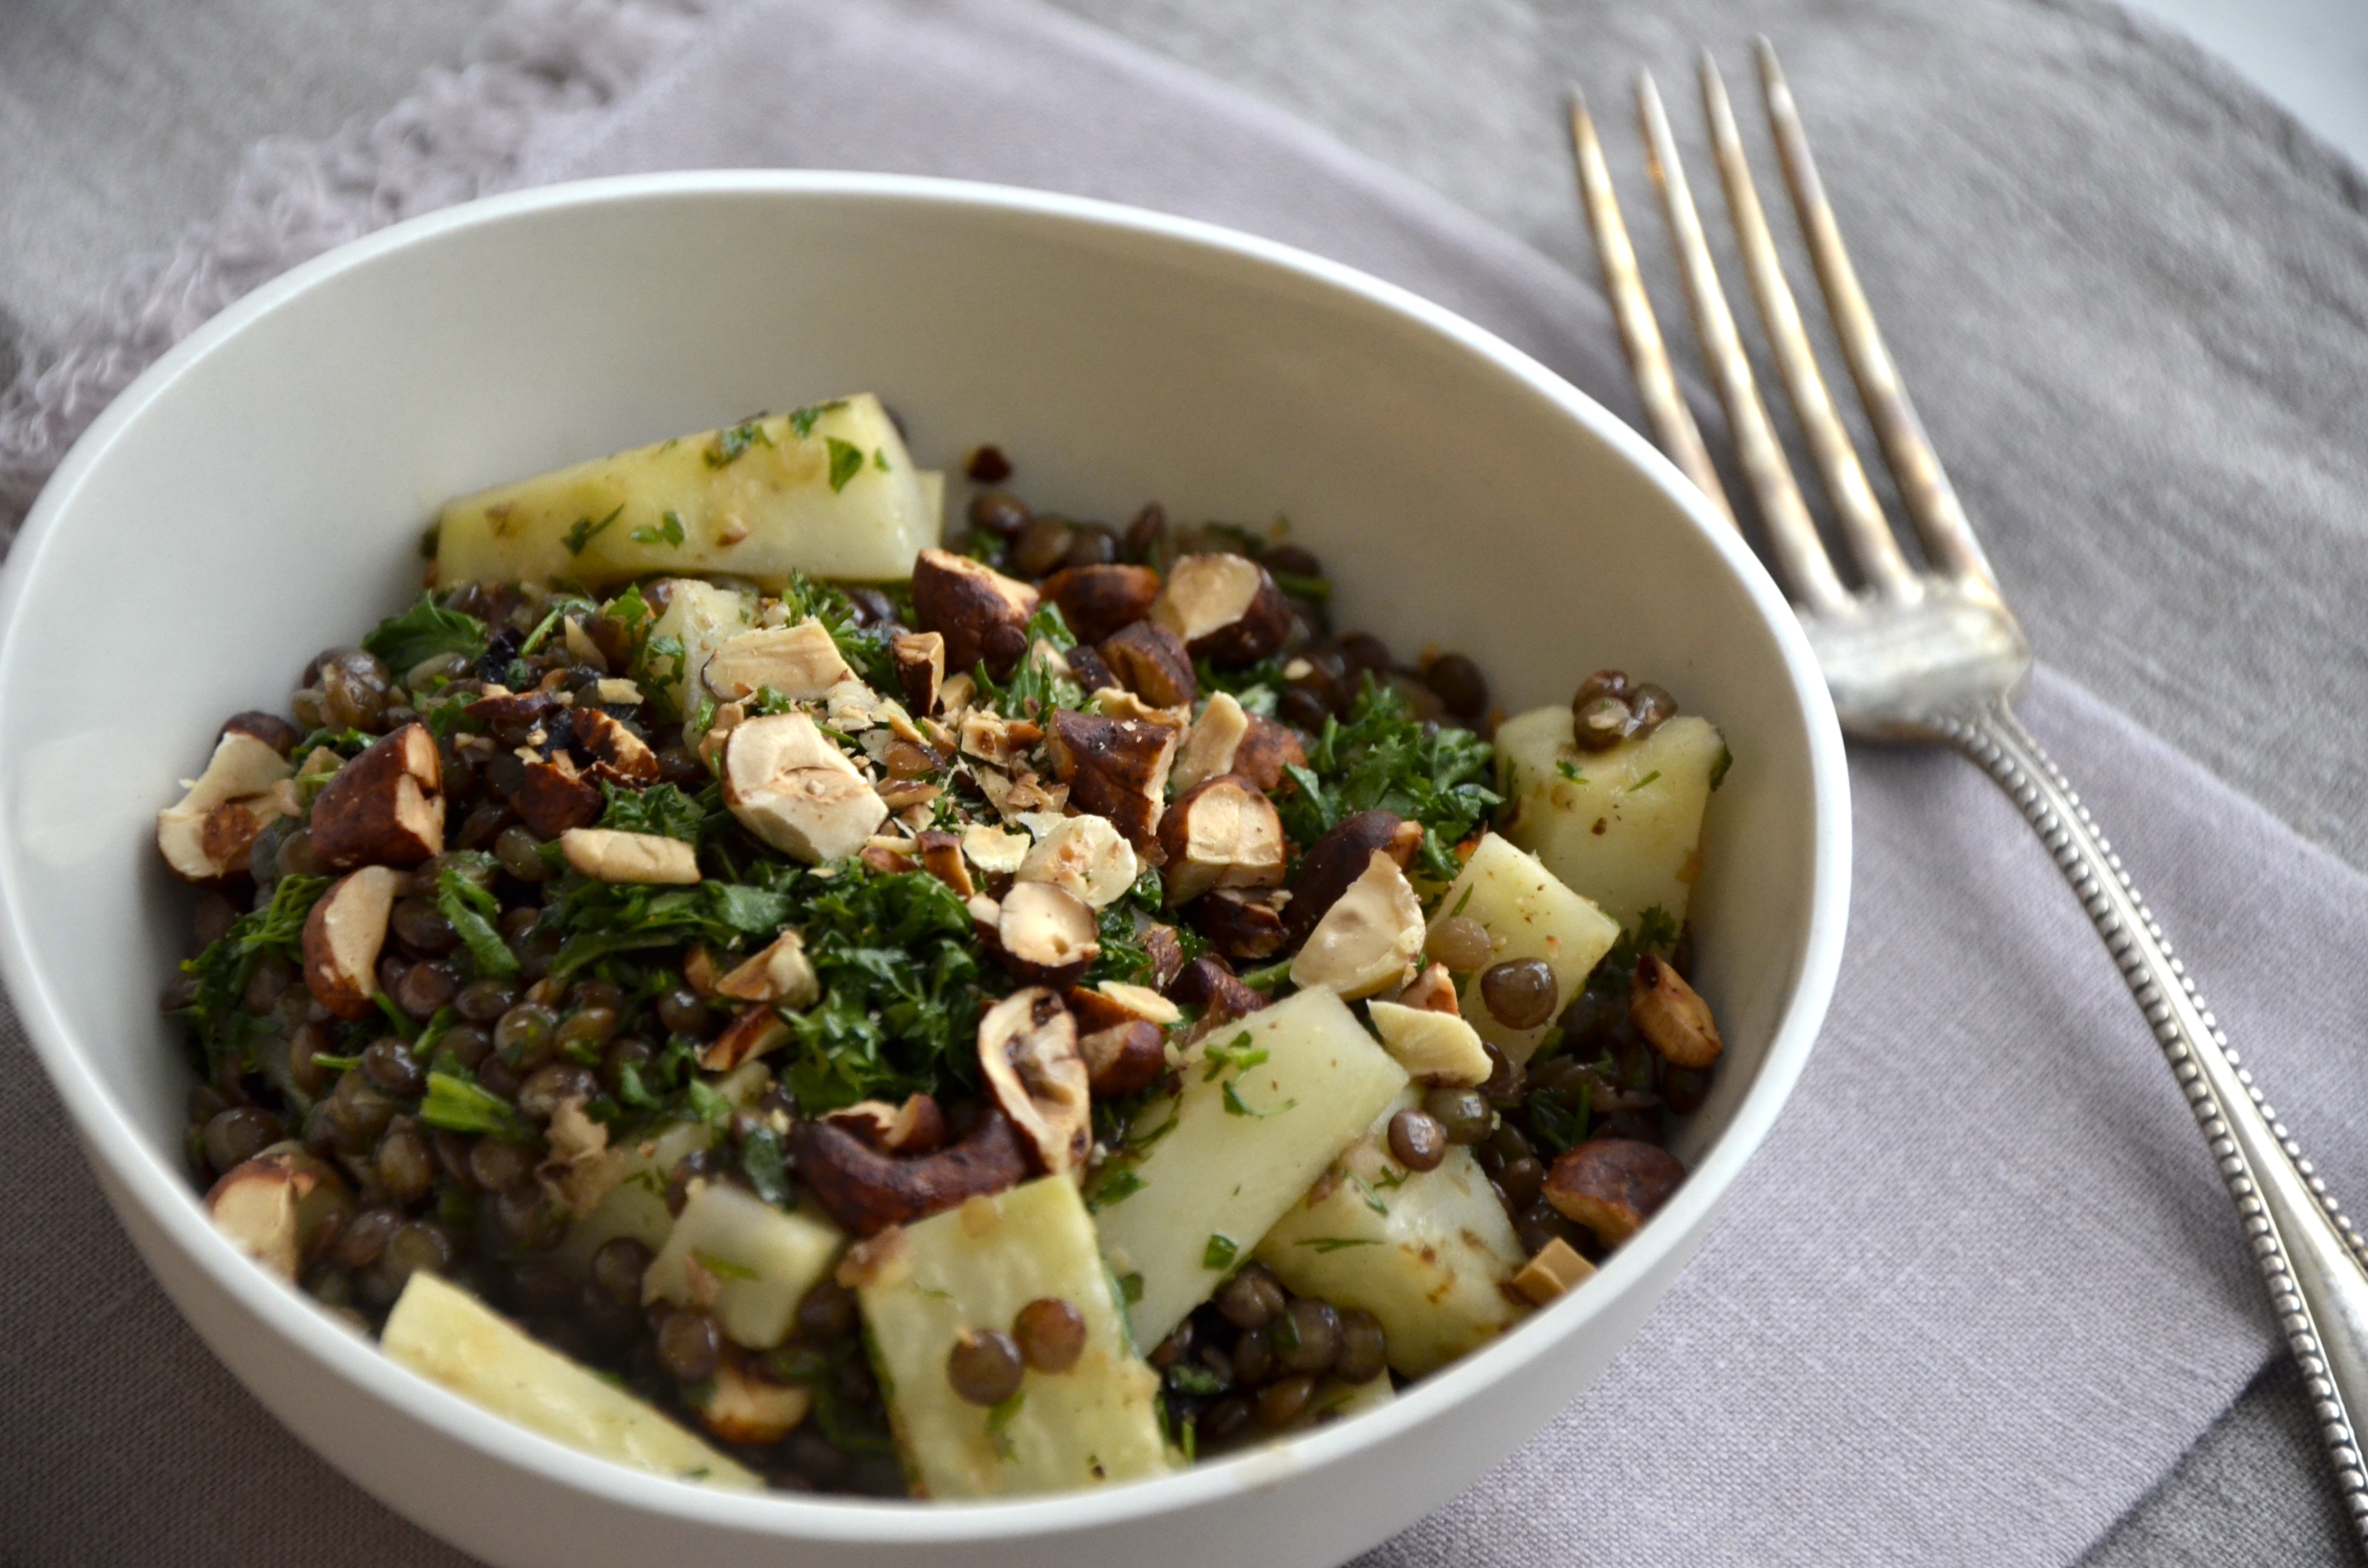
If you cook seasonally, this is a great winter salad for you. You can still find celeriac at the farmers’ market and, anyway, it stores for a long time. Lentils you should have in your pantry; nuts in your freezer. Some fresh mint is a mid-winter luxury to get at the grocery store but well worth it. With these few ingredients you can whip up a fabulously tasty warm winter salad. And you benefit from celeriac’s medicinal properties to boot. Having been around for about 40o0 years, historians note that the “Ancient Egyptians, Greeks and Romans considered celery a gift from the gods and divided celery’s medicinal properties sexually: the strong stalks that grew upward from the ground were judged to be a cure for all masculine dysfunctions, while the root that swelled beneath the earth’s surface was prescribed for female disorders.” Crazy but true. And why not?
1/3 cup whole hazelnuts (skin on)
1 cup Puy lentils
3 cups water
2 bay leaves
4 thyme sprigs
1 small celeriac, peeled and cut into 1cm chunks
4 tbsps olive oil
3 tbsps hazelnut oil
3 tbsps good-quality red wine vinegar
4 tbsps chopped mint
salt and black pepper
Preheat the oven to 300 degrees. Scatter the hazelnuts on a small baking sheet and roast in the oven for 15 minutes. Let them cool down, then chop roughly.
Combine the lentils, water, bay leaves and thyme in a small saucepan. Bring to a boil, then simmer for 15–20 minutes, or until al dente. Drain in a sieve.
Meanwhile, in a separate saucepan, cook the celeriac in plenty of boiling salted water for 8–12 minutes, or until just tender. Drain.
In a large bowl mix the hot lentils (if they have cooled down they won’t soak up all the flavours) with the olive oil, 2 tablespoons of the hazelnut oil, the vinegar, some black pepper and plenty of salt. Add the celeriac and stir well. Taste and adjust the seasoning.
To serve straight away, stir in half the mint and half the hazelnuts. Pile onto a serving dish or in a bowl and drizzle the remaining hazelnut oil on top. Garnish with the rest of the mint and hazelnuts.
To serve cold, wait for the lentils and celeriac to cool down before finally adjusting the seasoning and possibly adding some more vinegar, if you like. Add hazelnut oil, mint and nuts in the same way as when serving hot.
From Ottolenghi’s Jerusalem
snacking granola clusters
February 21, 2015
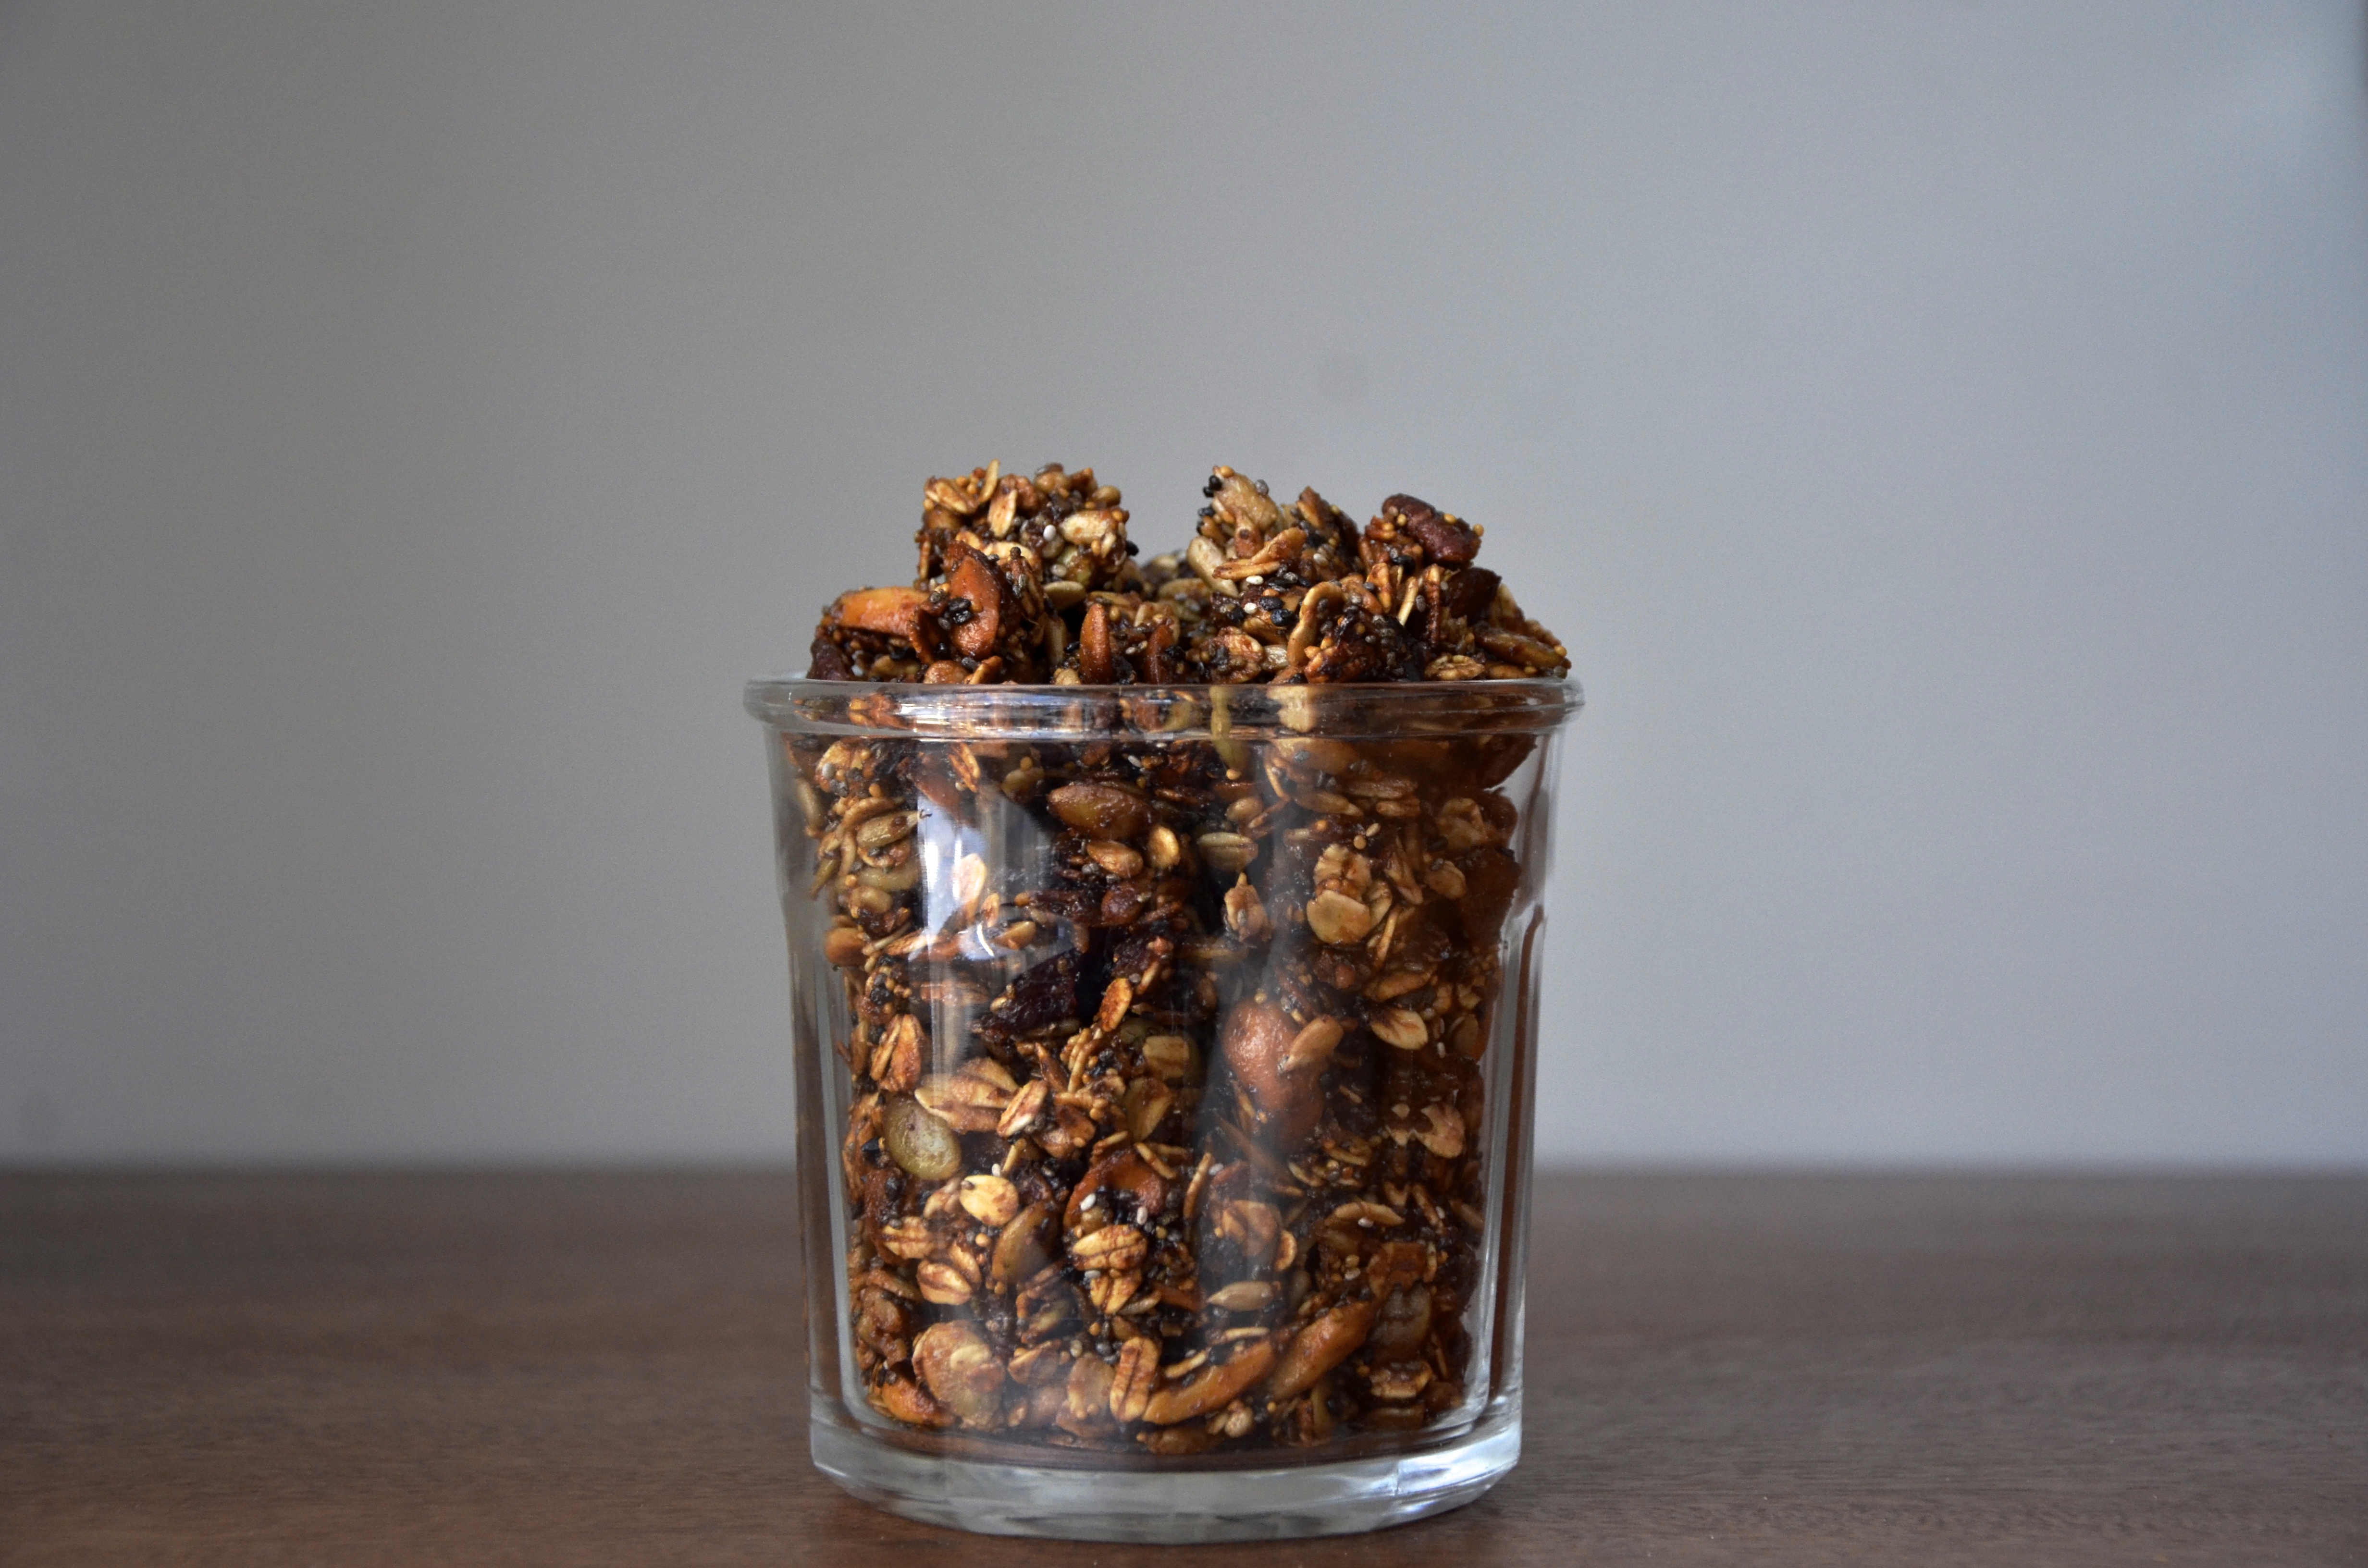
Unbridled credit for this recipe (and photo) goes to my daughter, Rebekah (and of course the original blog, The Gouda Life, from whence the recipe came). Bekah is home for reading week and craving all things healthy and non-residence. This snacking granola is perfect because it’s, of course, healthy – full of dates, chia seeds, nuts, and oats – but it’s also both crunchy and chewy, sweet and salty, nutty and fruity, a breakfast and a snack – all in one.
6-8 Mejool dates, pitted and chopped (and/or dried figs)
1 cup maple syrup
1/2 stick cinnamon
1/2 cup cranberries
2 tbsps extra virgin olive oil / virgin coconut oil
2 tbsps chia seeds
2 tbsps amaranth
1 tbsp flax seeds
1/2 cup raw pepitas
1/2 cup raw sunflower seeds
1 cup mixed nuts (pecans, almonds, cashews)
2 cups old-fashioned oats
1/2 tsp sea salt
Place the chopped dates, cranberries, cinnamon stick and syrup in a small pot over medium heat until it starts to bubble. Turn the heat down to a simmer and let the mixture bubble away for 8-10 minutes. By then, you should be able to use the back of a fork or spoon to mush it all together. It should be similar in texture to applesauce with some extra liquid from the syrup seeping out. Remove from heat and let cool.
In a large bowl, mix together all the other ingredients and stir to combine. Pour the slightly cooled syrup mixture over the dry ingredients and stir everything together with a spatula until all the oats/seeds/nuts are covered in the syrup. Turn 1/2 the into a large, high-sided cake pan (I used a 15” x 10” x 2” rectangular baking dish) and pack the mixture down as hard and evenly as you can. Add the rest of the oat mixture and press into the pan. Bake for 40 minutes. Remove and cool for 20 minutes.
Break up the mixture into large clusters and place back in the pan. Bake for an additional 10-15 minutes for crispy-edged clusters.
walnut red pepper tabbouleh
February 16, 2015
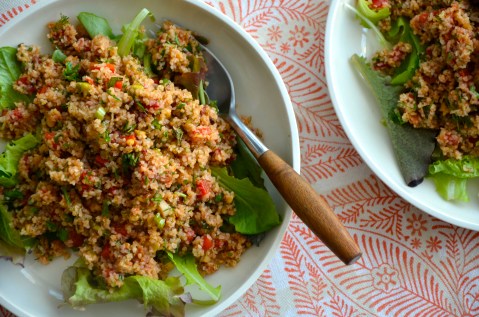
Making wheat into bulghur is an ancient process that originated in the Mediterranean region and has been an integral part of Middle Eastern cuisine for thousands of years. They say that in approximately 2,800 B.C., the Chinese emperor Shen Nung declared it one of five sacred crops along with rice, millet, barley and soybeans, and historical references indicate it was prepared by ancient Babylonians, Hittites and Hebrew populations some 4,000 years ago. The Roman word for it was cerealis; Israelites called it dagan. Other Middle Easterners called it arisah. And it’s been variously know as burghul, burghoul, balgour and boulgur. By any name you call it, it’s a solid, nutritious base for this walnut-red-pepper-type-tabbouleh with hints of smoky paprika and the always welcome freshness of herbs like dill, mint and parsley.
1 cup medium-course bulghur
2 cups water
6 spring onions, chopped
4 garlic cloves, roasted or raw, minced finely
3 red peppers, roasted, seeded, skinned, and diced
1 tsp smoked paprika
2 tbsps tomato paste
4 tbsps olive oil
1 cup walnuts, toasted, chopped finely
3 tbsps roughly chopped parsley
2 tbsps roughly chopped mint
1 tbsp roughly chopped dill
sea salt and pepper to taste
Place bulghur and water in a pot and place on high heat. Once water comes to a boil, turn heat down and let simmer until bulghur is cooked. Drain if necessary and place cooked bulghur in a bowl. Add the remaining ingredients, mix well and season.
Adapted from Casa Moro by Sam and Sam Clark
